Thursday, April 30, 2015

Hallway Makeover with Stencil1

Have you ever noticed when you start redoing one room of your house you can't stop there? One room starts looking good and so it makes the rest of the house look bad??? So one room leads to two and so on...

When my dad agreed to redo the kitchen it led to working on the dining room, due to structural issues, then after I got the dining room all fixed up, it made the hallway look pretty shabby. So I did a quick coat of white paint to at least freshen it up. 

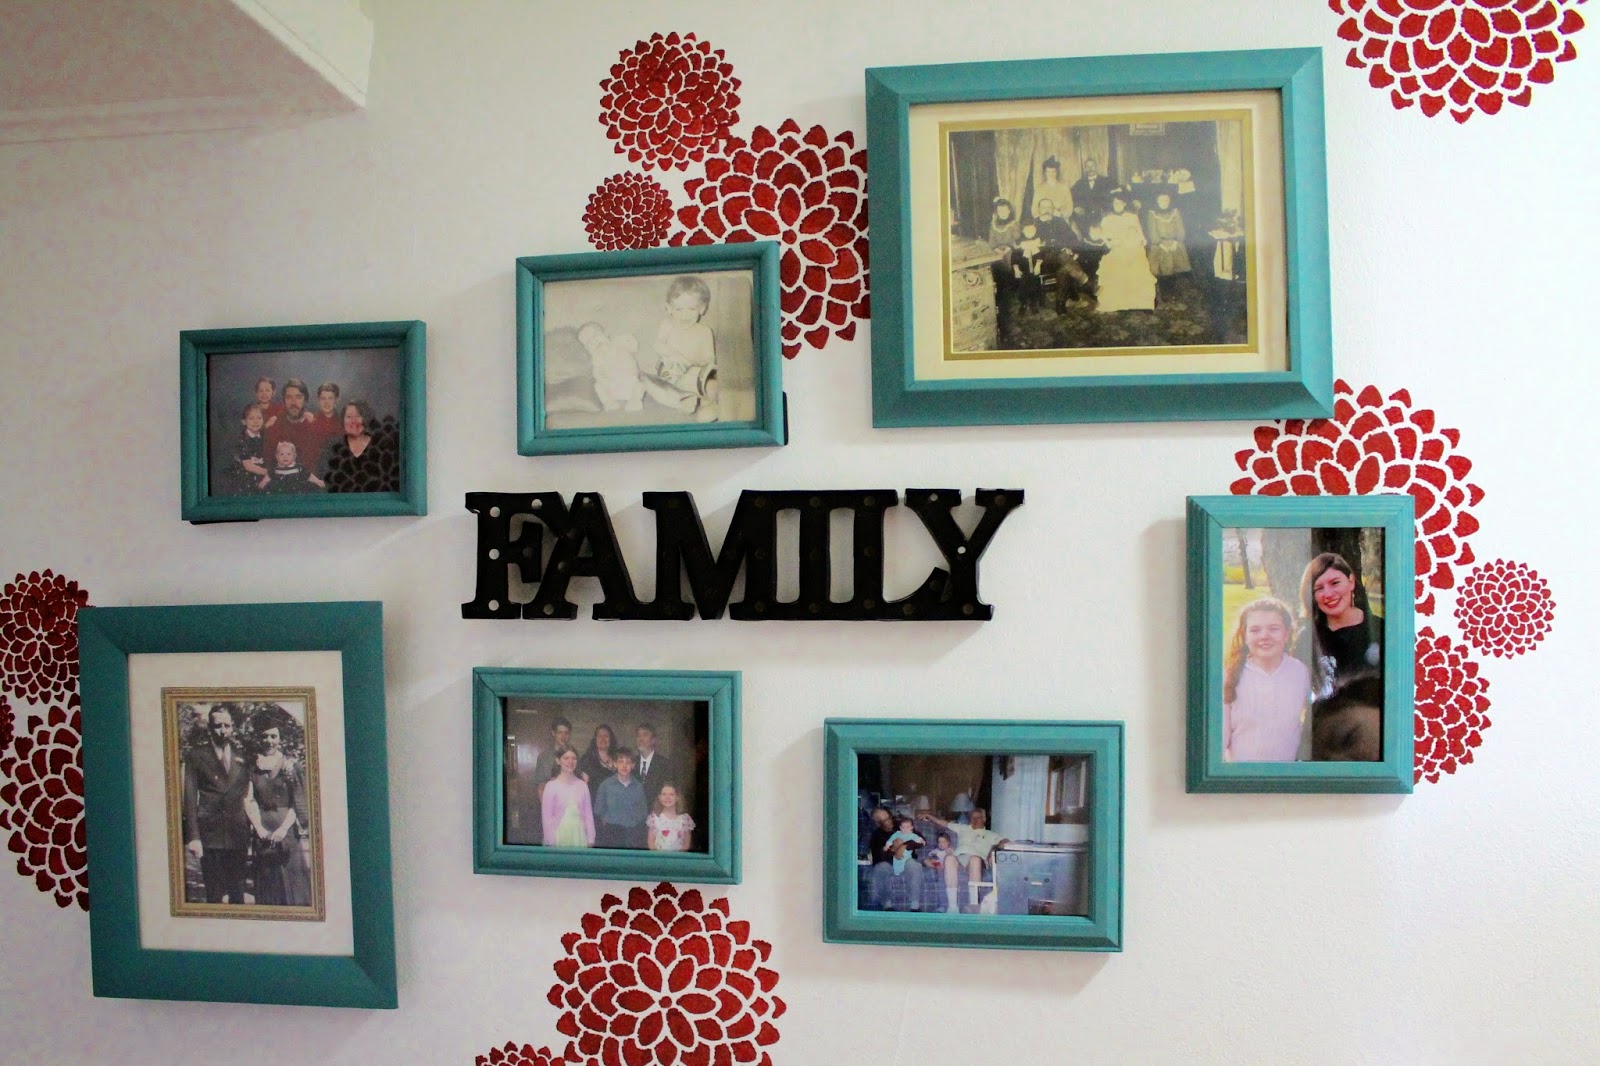
My hallway has always been my photo gallery. A hallway of memories so to speak. I never really had any rhyme or reason to it. Since I was redoing other rooms, I decided it was time for a change. I wanted to still have my hallway of memories, but wanted a more cohesive feel to it. Inspiration struck  at the Craft and Hobby Trade show when I saw a cool mum stencil from Stencil1. 

My idea was to use the 3 mum repeat stencil down the hallway and then paint my hodge-podge of frames all the same color to tie everything together.  So I tucked the idea into the back of my brain for a "when I have time" project, but then Stencil1 emailed! Their repeat pattern stencils won PRODUCT OF THE YEAR and was I interested in using one of them for a project? I shared my hallway idea and they loved it as much as I did. 

So Stencil1 set me up to do my "hallway makeover."


For my project I needed: Fresh wall space, paint, roller and tray, Stencil1 stencil (I used 3 mums repeat,) and painters tape. 

Since my halls were already bare and freshly painted I didn't need to apply a base coat. I wanted to have the mums tumbling all over the wall in more of a casual look BUT I am a little OCD when it comes to casual things. Some people can just casually pull something together, for me it takes a bit of planning to be casual!  Therefore to help with the placement I photo copied the stencil several times. I then used painters tape to place the images where I wanted them to "casually" go. This allowed me to play with the placement and positioning of the stencils and see the overall effect without having to commit quite yet with paint. 

After I was satisfied with the positioning, I was ready to get painting. Stencil 1 sent me their roller tray kit , to use with my project. The brush for the roller is a good quality sponge, that holds the paint well.

I used a few pieces of painters tape to hold the stencil into place and then I rolled my paint over the stencil. They say you only need a couple of pieces. I wasn't that brave (remember that thing I have about being a little OCD...) So I used a bit more than recommended to avoid what I call a "Betsy Mishap" of the stencil falling off mid paint. 

I found the sponge roller held ALOT of paint, and so it made sense to roll off some of it before covering the stencil. This helped prevent bleed through with the stencil. I also found you needed a lighter touch, if you were heavy handed with the amount of pressure you applied to the roller, you ended up with pools of paint that also could cause bleed through of your image. One failed attempt, and both these lessons learned I was ready to go to town.


I would take down my photo copy image and then replace it with the stencil and paint away. 
I moved from left to right top to bottom and when I got to the little storage cubby decided to paint that as well (the little roller was perfect for the small spaces around the handles and along the edges!)


I loved the effect of the mums tumbling down the hall way. 


All that was left was to paint the frames and hang them on the wall and decorate! 


I loved the finished product and can't wait to try stenciling elsewhere!


Friday, April 17, 2015

Scrapbook Expo 2015-Milwaukee, WI

Shoebox 1K is on the road! Come visit us this weekend at the Scrapbook Expo in Milwaukee, WI. We will be running the baggage check booth and holding basket raffles. We have over $2000 in prizes donated by our generous sponsors! There are prizes from Craftwell, Creative Options, Fiskars, Michigan Scrapbooker Magazine, Peddler's Den, Forget-Me-Not Memories, JoAnn's Creations and MORE!!! Tickets are only $1 each if you by 10 you get 2 free and if you buy $25 in tickets you get a FREE gift valued at $20!!!
WE HOPE TO SEE YOU THERE!!!

Friday, April 3, 2015

Best Blogger Craft 2015-free ebook

The votes were tallied and the best blogger crafts were selected for 2015 and you can find all of them in the Fave Crafts "Best Blogger Crafts 2015" free ebook.

http://www.favecrafts.com/Most-Popular-Crafts/The-Best-Blogger-Craft-Ideas-2015-Home-Decor-Ideas-DIY-Jewelry-Easy-Crochet-Patterns-and-More-free-eBook 

In the book you will find all types of crafts from crocheting and knitting to paper and wood crafts-including the pie safe project from yours truly! Tons of inspiration and did I mention it's absolutely FREE?? Be sure to download your copy by clicking on the image! 


Wednesday, April 1, 2015

Doodled Handkerchief Doll-April Mystery Box Challenge

Challenge Accepted!

My friends over at I Love to Create asked if I was up to the April Mystery Box challenge and you bet  accepted no questions asked! I love playing with their products and couldn't wait to see what I had to create with! 

Photo courtesy of Margie Higuchi

This fabulous assortment of products came in my mail box and I couldn't wait to play with it! (In fact so much I didn't snap a quick "before" photo! Thanks Margie for coming to my rescue!) I was excited to play with the Tulip Fabric Markers and inside our package was a plain cotton handkerchief. 

When I was younger, I remembered having a hankie (or a cloth napkin if we were at a restaurant,) turned into a doll to keep my sister and I amused when there was a long wait. The dolls were put together with very little effort, and kept us amused for quite some time, first with the "creating process" and then using our imaginations to play with our babies.  I thought it would be fun to recreate a doodled version of my childhood memory.


 To add some color and fun to the plain white of the cotton cloth, I started with some doodling around the hem of the hankie, before I tied her into doll shape. 


After doodling, I created her head by stuffing it with a few inches of cotton batting and tying it off with ribbon. I knotted the top hem around her "neck" to create her arms/shoulders, then drew on a simple face. 

I love how she turned out and how little time it took. From beginning doodle to finishing touch she took less than 20 minutes! I can't wait to make more! This sweet baby is going to find it's way into a shoebox gift for Operation Christmas Child and I'm sure she will be joined by more than a few sisters and brothers as well!

Thanks I Love to Create! I had so much fun recreating a childhood memory!!!

How would you like to win a fun prize package from i Love To Create?  Use the form below to enter :)
a Rafflecopter giveaway