Saturday, March 31, 2012

April Fools

Yup, it's that time of year again, when the kind, good hearted, mommy that I am, turns into a trickster! This year my inspiration came from an American Girl doll. (Well mini food for that American Girl doll :) Since April Fools Day falls on a Sunday I'm kinda limited on time to mess around with food and all so enter in the donuts. Not just any donuts, mini donuts. The idea is to tell the kids "cause we have to get out of the house early I picked up donuts for breakfast and that they can find them on the counter."

Now any trick has to have some background work, you will need:

2-3" x 4 " pieces of cardstock (I used white)
Glue Dots
Score Board (or a way to score the cardstock)
Scissors
15 Cheerios (or similar shaped cereal)
White frosting
Sprinkles
Toothpick if desired


With one piece of cardstock you will score at 1/2 " on all four sides.

The other piece of cardstock  will be scored at 5/8" on all four sides.

Next you will cut to the score line along the shorter score. (Cut on the left side on all four sides-see photo)

Then fold along all of your score lines. Fold the small tabs you created on the inside of the sides of your box. Use a glue dot to secure. Repeat with the other piece. You will notice one box is smaller than the other. You can fit the pieces together now to form your mini doughnut box.


Now onto the doughnuts:


Using the frosting, lightly dip the cheerio into the frosting and then into the sprinkles. If desired you can take a tooth pick and round out the center of the donut, but it isn't necessary.

Repeat with the other cheerios, and then place in your box. Close it up and get ready to have some kids mad at you (especially since they are now expecting donuts!!)


I'll let you know how it goes. I'm not only doing this for my kids, I'm going to bring them in for my kids in Children's Church tomorrow too! (I even have it as part of the object lesson for our Easter Story!) I'll let you know how it goes...or if I have to buy lots and lots of donuts! ;)

April Fools

Tuesday, March 27, 2012

Thank you cards

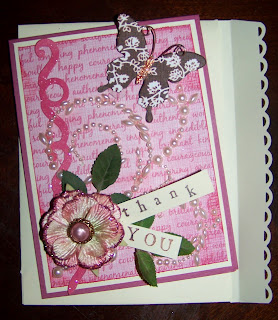
I had a couple of thank you gifts to give to friends and wanted cards for the group to sign. Both of the friends the cards are going to are the "crafty" type so it's fun to create for them!


To save time both cards have a similar design. I have a layered base, with a left hand border, then layered bling flourishes, flowers and a butterfly accent. The one on the right needed a bit more so I raided the silk plant off my shelf for a couple of leaves as a filler.  The sentiment was simple, a message stamped out on strips of paper and tucked under the flower with glue dots. To finish it off, I added an extra touch of elegance with a punched edge on the envelope. (I had to make my own to accommodate the chunky embellishments.) 

Supplies used: Cardstock- paper adventures, patterned paper-GCD Studios Brave Girl collection, Ink- ColorBox, bling flourishes and flowers and prima, butterflies-altered chipboard embellishments GCD Studios, Glitter flourish border-GCD Studios, Flower ribbon trim-May Arts (Satin Cutout), leaves from my silk plant ;) Additional tools-Score Pal , Fiskars Apron Lace border punch.

Both gals loved their cards, and my "happy crafty moment"-one of them has her's on permanent display at her house. I love it when people really not only appreciate what I make them, but love it as well! It's good medicine for my crafty heart!

Monday, March 26, 2012

Thanks Fiskateers!

Thanks to Fiskateers and everyone else that followed along on the Fiskateer Spring Blog Hop! I had fun seeing all the inspiration along the way!

I do have a prize to award and the Random.org number fell to


Blogger lizzie said...

oh my gosh this is an amazing project!!!!
I'm a new follower... yea you wow'd me THAT much! your blog is very awesome!!!
March 24, 2012 5:30 PM

Lizzie email me at lets_scrap (at) juno.com your address and I'll get your punch out to you!

Friday, March 23, 2012

Welcome Fiskateers!

Welcome to the 2012 Fiskateer Spring Blog Hop!

If you are coming here from Cortney # 8459 (and Shelly #8356)'s blog blog you are in the right place if not, you can go to Fiskateers and start from the beginning.

Anyone that knows me knows I LOVE Fiskateers! This fabulous crafting community has not only provided me with inspiration and friendships, but a voice into a company that creates some of my favorite tools! If you would like information on how you can become a Fiskateer click on the link above and then "join".

The project I'm sharing with you today is using one of my very favorite tools the Fiskars Craft Drill. I didn't know this baby existed until I read about it on the fiskateer blog several years back and once I got one, I started using it to drill everything! (Plus as an added bonus, use a screwdriver bit on it and saves you from using the power drill on many projects.)

I initially found this project on Pinterest the original poster was from The blissfully content life. She used a hammer and nail for the project, I thought using my Fiskars Craft Drill might be a bit easier.

Supplies needed: A mason jar-I love the look of the old ones and found a couple at a garage sale), A pump top-you can pick these up at a craft store for around a dollar or go green and recycle one from a shampoo bottle like I did, a rubber washer, hot glue gun, Fiskars craft drill and a drill bit to match the size of the tubing of your pump, scissors and a pair of pliers.

1) To start mark off the middle of lid, using your drill make a hole in the lid, If you are using the antique style jars there will be a porcelain liner under the lid that will crack, remove those pieces when you are able.

2) When your hole is made test to make sure the pump tube will fit. You might need to drill holes side by side for some of the pumps that have oblong shaped upper pieces for the pump mechanism. If needed you can use a pair of pliers to bend down to finish any rough edges.


3)Then measure the pump tubing against the jar and trim as necessary. Remember to trim the tubing at an angle, if the tubing is flat against the bottom of the jar the soap can't get into the pump.

4) When it's trimmed, remove the tubing from the lid and thread the rubber washer onto the pump making sure it's smaller than the outside of the pump housing, (you can trim it if necessary.) Thread the pump back into the lid and glue the pump into place using hot glue. I find it easier if you hold the pump upside-down by the tubing to glue.


5) When the glue is set you are ready to fill it and enjoy.


Like it?? (I couldn't resist getting my freshly bloomed tulips in the shot, I love spring!)  This project really takes longer to explain than actually do and the end result is an adorable "vintage" soap dispenser!

I'm so glad you followed along the Fiskateer blog hop! Thanks for stopping by!

The next stop on the blog hop is Tracie #8436's blog. Be sure to stop by all of the blogs on the hop many are giving away sur-prizes and you wouldn't want to miss out.

Speaking of prizes. You have an opportunity to win one here. Simply leave a comment here and you'll be entered to win your very own Fiskars "Seal of Approval" XL Squeeze punch. (As with all my giveaways if you are a follower I'll enter you twice! ) Sorry due to postage costs this is open to U.S. only. ***Comments are now closed for this giveaway. ***

Also if you are a knitter be sure to read my post on Knitting where I'm giving away a great book from the "yarn girls" (giveaway open till April 1, 2012)

Wednesday, March 21, 2012

Knitting!


So I'm still knitting! Granted if it wouldn't have gotten so WARM out I might be more inclined to work on a scarf more. (Well that and if I worked on it more than once every two weeks with mom.) I am progressing though and mom decided to join me with the knitting. She is working on learning a lacy pattern to make a shawl for a friend. (I'm excited about the learning process cause the results of the learning will be a scarf for me :) So we happily knitted while watching a movie at the lab today.

The scarf is about 2 feet long at the moment (more if I S...t...r...e...t...c...h) which I will admit I'm inclined to do. I will say mom was right, I didn't pick the best yarn to learn on. (It's one of those thread wrapped types that likes breaking easily.) It is pretty though!


Just because I haven't been "working" on the knitting doesn't mean I haven't been thinking about it. I happened to find a book on the subject that I started reading "The Yarn Girls Guide to Beyond the Basics"  by Julie Carles and Jordana Jacobs. I know I still need the BASICS, but I love the simple way the book diagrams stitches and explains things like casting on (still haven't totally mastered that) knitting and purling, picking up and dropping stitches and more. So far it's been a great read and is making want to achieve more than just the basics and try for something a bit more difficult.

When I got the book I happened to pick up an extra copy....so if you would like a copy of the book simply leave a comment, like always followers get a 2nd entry.  Sorry with the cost of shipping I have to leave this open to US only. Comments will be open till April 1, 2012

Monday, March 5, 2012

She's THREE!!!


I so love when I get to make something crafty for someone special and they just LOVE it to pieces!!! My friend's daughter was turning 3 and remembering back my girls loved their play kitchen when they were little but I knew space was premium at my friends house and who really has room for a huge kitchen? Putting on my thinking cap, I wanted something that you could store all the pieces in, yet could be used to play with as well.

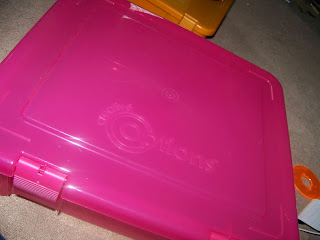
It needed to be small enough a child could pick it up with ease, yet large enough to hold food and dishes and such, not to mention have a flat surface for a "stove." Nothing seemed right till when looking at my craft shelf realized a Creative Options Album Tote was perfect.

It was small enough a child could handle it, yet big enough to hold what I wanted. The flat surface of the top would work perfect for a "stove", and the lower height means it could slide under the bed, plus the fact the top was hinged meant it couldn't get lost as well.
But as you see the surface looks nothing like a stove, so I needed to decorate it a bit.

To start I grabbed some vinyl sheets, my Fiskars Ultra Shape Express and a couple of templates. I used pink and black to make the burners and knobs. Black cause it seemed right and pink to match our pink "stove"
I kept things simple, layered circles, for the burners, and stars for knobs. Making sure the surface was clean I stuck things down, using a bone folder to smooth out bubble and wrinkles when necessary.


Then I added a couple of baskets inside to hold the food, they can also be taken out for shopping, or to turn into sink. As my daughter added, you can also lift the lid to be a dishwasher or an oven.


At the birthday party the present was a hit with kids and parents alike, as the birthday girl's dad said "we like presents we can put away" and the birthday girl was so excited to play with it she didn't even want to eat her cake!