Friday, March 1, 2024

Bag Tag-featuring Artesprix Sublimation Ink

I love Artesprix inks and markers! They allow me to take my "paper crafting" to a whole new level. Using the process of sublimation, your stamped or inked artwork becomes a permanent design on polyester substrates.


With my many roles in life, I find myself traveling with multiple bags. One for class kits, one for paperwork, one for kid’s ministry… sometimes it is difficult to tell things apart! I love adding touches of ribbon or pom-poms to distinguish my bags, so when I was asked to do a project for Artesprix, I just new I had to design a bag tag taking personalization to a whole new level. 


Grabbing Artesprix's fabulous Inks and markers, some favorite stamps and my ever trusty Gel Press Plate I began creating this adorable bag tag! Be sure to check out the whole tutorial here: Artesprix Bag Tag with Gel-Press Plate

Friday, February 16, 2024

My girls!

So I have began a project. I think girls need dolls. When I was little I love playing with my dolls! Back in 2020 I was given kits to make 18 inch dolls and the community rallied to help make/purchase for them clothing and another friend made them quilts. These dolls were sent in Operation Christmas Child shoebox gifts. Becoming a tangible expression of God's love to children all over the world.

I loved sending them and even heard back from the mother of one of the recipients. The doll became a member of their family!    


Last year I realized that so many of these style dolls are "slightly" used and then cast aside and I began wondering if I could learn to restore them to their former glory The goal being "new condition". I wanted to send them in Operation Christmas Child shoebox gifts and to make it through customs as a "gift" they needed to be new condition. 

So arming myself with the all of the knowledge the internet could provide through websites, blogs, and You Tube videos, I set out to learn to restore 18 inch style dolls. I also was able to pick up some new dolls at incredible an incredible clearance sale (but they too needed a bit of tlc.)

So here's a photo celebrating my efforts so far this year! Can you tell who is new, who was just given a bit of TLC and who was "made new?" There are some of each in the photo below!!


I only have 40 or so more to go!! Then I'll develop a back story for each girl and get her ready to travel into a shoebox and become a tangible expression of God's love to her new mom!


Saturday, March 18, 2023

Guest Desginer-Artesprix Sublimation Ink-Lucky Dog


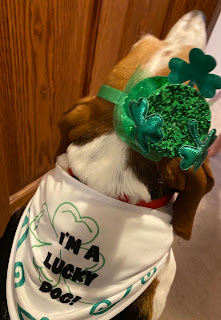
Artesprix asked again and I was happy to oblige!! I was recently asked to be a Guest Designer for Artesprix. They make a fun sublimation ink. It comes in stamping ink, markers and now even paint to help you create one of a kind custom projects in permanent vibrant color!


My dog Diamond has the best possible outcome with the worst possible luck! So we are always saying I'm a Lucky Dog! (said in the sing song commercial voice of the 80's) It was fun to take my play on words and the artwork I created and turn it into a one-of-a-kind bandana for my dog for St Patrick’s Day!

Check out the full tutorial (and more photos of a rather unwilling model) on the Artesprix Blog here:

Artesprix Lucky Dog Bandana 

Thursday, September 15, 2022

And the Winner is !!!

 ME!!

That's right my project was voted "America's Favorite Craft"! Top prize baby!! What an honor and blessing to be chosen!


See all the fabulous entries here:https://www.favecrafts.com/Unexpected-Ideas/Americas-Best-Craft-Contest-WINNERS


Thank you to everyone that voted~ I appreciate the support and a special thanks to the sponsors:

Tuesday, September 13, 2022

Quilted Puzzle Play Mat- America's Best Craft Contest 2022

I need your vote!!

This summer I had the privilege of attending the H+H Americas show in Chicago as a guest of Prime Publishing. This was the first time this show was held in Chicago and was primarily textiles and fiber arts. If you know me at all, I dabble in most things creative but while I know how to sew, I don't do it enough to be proficient at it and as far as knitting or crocheting....lets just say I do "Ok" with arm knitting, but if you give me needles I make really good holes (and not intentional.) 

All this to say when I decided to go I wasn't sure what to expect. I just knew I had not been to a "Live Show" with my creative tribe in 2 years and I was missing them. I was so glad I went as I was blown away! The show was small but well attended. Vendors were not just eager to "sell" but willing to talk with you about ideas and products and projects. 

One highlight of the show for me was the Influencer Networking event hosted by Prime Publishing. There I was able to spend some one on one time with owners, designers, and marketing directors from several companies. Talking about what they were looking for and what I did in the creative world. Naturally there might have been a mention or two of my work with Operation Christmas Child :) 

As part of the event, every attendee at the Prime Networking Event was invited to create a project using at least one of the sponsors' products. This project would be entered into a contest to be named "America's Best Craft". Putting my thinking cap on and pushing myself WAY WAY (did I mention WAY )out of my comfort zone, I decided to design a quilting project for Operation Christmas Child.

Introducing the "Quilted Puzzle Play Mat" 

"Who doesn’t love driving their toy cars through the city? What if you could change that city every time you drove through it?? Created with colorful fabric, fusible interfacing, Velcro©, and some DIY iron-on appliqués, this Quilted Puzzle Play Mat is sure to be ever-changing fun for your little ones. The best part, it folds up to fit in a diaper bag or backpack! Little one doesn’t play with cars? Instead of appliquéing a city….How about a jungle scene with toy animals, a castle scene or alien planet to land on with your spaceship... the only limit is your imagination!"


I had so much fun designing this!  Colorful fabric from Clothworks. All the pieces are interchangeable thanks to Velcro© and creating the applique's was easy using Heat and Bond -Lite from Therm-o-Web. The cool part (I mean besides the fact you can design your own city.) this folds up to 5"x5" x4" perfect size for a shoebox!!

 All this to say, I could use your vote. The contest voting is open through September 14 and I would love your support! https://www.favecrafts.com/voting/Americas-Best-Craft . You can vote once per day through the 14th.

A huge thanks to all the company sponsors: H+H Americas, Clothworks, ViviLux, Craftmarker.com, M Creative J, Prym, Universal Yarn, and Prime Publishing!


Monday, September 12, 2022

Blog Hop-with Gina K Designs "Flutter By" Shrink Art Earrings

Welcome Designer Crafts Connection Blog Hoppers! 

My mom loved daisies and butterflies, especially Monarch butterflies. So whenever I see a Monarch butterfly I think of her. Imagine my surprise when I was sent the Gina K Designs "Never Lose Hope" Mini Acrylic Stamp Set to create with for the Designer Crafts Connection Blog Hop! It seemed like it was meant to be. 


"Flutter by"-Shrink Art Earrings

Supplies- "Never Lose Hope" Mini Acrylic Stamp Set-Gina K Designs, Grafix Shrink Film, Permanent Markers, white gel pen, Staz-On ink pad-Black,  acrylic stamp block,  2-3" long pieces of chain, jump rings (3mm,6mm), fishhook earring pieces, small glass beads, headpins, round nose and needle hose pliers, wire cutters, oven, parchment paper, scissors, hole punch, cookie sheet. 


Using the Staz-on ink and an acrylic stamp block,  stamp your butterfly image onto the shrink film and allow to dry. When dry, color in image using the permanent markers. I like starting with the darker colors and blending with the lighter ones. Accent with the white gel pen. Allow to completely dry before cutting out.  Please note your colors will shrink "more intense" 


Preheat your oven to 300 degrees F. Cut your designs out of the shrink film. I like to use larger scissors to cut out the basic shape and then use detail scissors to get the tiny parts. Using the hold punch, punch holes in the corner of the images.

 Line your cookie sheet with parchment paper. Lay out your shrink art stamped images.  If you are concerned with your images not shrinking "flat" then cover them with another piece of parchment paper. Place in oven for 2-3 minutes to allow images to fully shrink.  They will be about 20% of the original size when finished. Allow to cool before handling. 


To create your earrings. Thread your beads onto your headpins. Using the round nose pliers, loop the end and snip off the excess. Repeat until you have the desired number of beaded head pins.  Thread larger jump rings through the holes punched in the butterflies. Use the smaller jump rings with the head pins. Attach the butterflies and beaded headpins with the attached jump rings to the chain alternating between the two. Because the shrink film is clear you can see your image on both sides. This allows you to hang your butterflies going either direction. (See photo.) Attach the chain to the earring hooks. 


Bonus Card "Spread Your Wings and Fly" 

Since I had some extra shrink art butterflies to play with and some gorgeous Gina K Ephemera, I set out to make a card. I used the same butterfly stamp from the Gina K "Never Lose Hope" set  and watermark ink to create a subtle (and matching) background. After wrapping twine around the cardstock and tying on the butterfly, I layered the Gina K Ephemera using foam dots, and added the sentiment.


Supplies used: "Never Loose Hope" Mini Acrylic Stamp Set-Gina K Designs, Watercolor Floral Ephemera Pack-Gina K Designs, Cardstock, Trimmer,acrylic block,  black ink pad, watermark inkpad, bakers twine, extra shrink art butterfly, adhesive, foam dots.

Thanks Gina K for providing the stamps and ephemera to play with! I LOVED THEM!

Want to see more gorgeous Gina K Design Projects? Check out the rest of the Designer Crafts Connection Blog Hop Designer Crafts Connection-Gina K


Monday, August 1, 2022

Guest Designer-Artesprix Sublimation Iron-on Ink

 Updated with new link! --I made the favorites category on the Artesprix blog!


I was super excited to be asked to create with Artesprix Sublimation Inks and Markers as a guest designer! With my many roles in life, I find myself traveling with multiple bags. One for class kits, one for paperwork, one for kid’s ministry… sometimes it is difficult to tell things apart! I love adding touches of ribbon or pom-poms to distinguish my bags, so when I was asked to do a project for Artesprix, I just new I had to design a bag tag taking personalization to a whole new level. 


Grabbing Artesprix's fabulous Inks and markers, some favorite stamps and my ever trusty Gel Press Plate I began creating this adorable bag tag! Be sure to check out the whole tutorial here: Artesprix Bag Tag with Gel-Press Plate