Monday, March 5, 2012

She's THREE!!!


I so love when I get to make something crafty for someone special and they just LOVE it to pieces!!! My friend's daughter was turning 3 and remembering back my girls loved their play kitchen when they were little but I knew space was premium at my friends house and who really has room for a huge kitchen? Putting on my thinking cap, I wanted something that you could store all the pieces in, yet could be used to play with as well.

It needed to be small enough a child could pick it up with ease, yet large enough to hold food and dishes and such, not to mention have a flat surface for a "stove." Nothing seemed right till when looking at my craft shelf realized a Creative Options Album Tote was perfect.

It was small enough a child could handle it, yet big enough to hold what I wanted. The flat surface of the top would work perfect for a "stove", and the lower height means it could slide under the bed, plus the fact the top was hinged meant it couldn't get lost as well.
But as you see the surface looks nothing like a stove, so I needed to decorate it a bit.

To start I grabbed some vinyl sheets, my Fiskars Ultra Shape Express and a couple of templates. I used pink and black to make the burners and knobs. Black cause it seemed right and pink to match our pink "stove"
I kept things simple, layered circles, for the burners, and stars for knobs. Making sure the surface was clean I stuck things down, using a bone folder to smooth out bubble and wrinkles when necessary.


Then I added a couple of baskets inside to hold the food, they can also be taken out for shopping, or to turn into sink. As my daughter added, you can also lift the lid to be a dishwasher or an oven.


At the birthday party the present was a hit with kids and parents alike, as the birthday girl's dad said "we like presents we can put away" and the birthday girl was so excited to play with it she didn't even want to eat her cake!


Friday, February 24, 2012

My hero

It was a cold and snowy morning when my daughter, my nephew and myself had to get to the school by 7am to set up for a "Drive 2 Survive" teen safe driving expo. For living through our Illinois winters, this year had been surprisingly mild for the most part, but that morning after several days of warm weather we got hit with a snow storm. 10 minutes south of us got a dusting, 10 minutes north of us pretty much the same. Not us, we got frozen rain then snow.

So I'm driving along telling the two student drivers in my van about the need to slow down on roads like this when it was snowy and icy. The speed limit was 55. I was going maybe 30 when all of a sudden I had no control over the vehicle. We fishtailed for awhile then finally found ourselves hitting the ditch and then sliding forward sideways several feet hitting quite hard. Thank the Lord everyone was ok. We had landed with one tire up in the air spanning the ditch.

The first call I made was to our friend Andy, "Hey Andy ya know that big shiny new tow truck you got??? Ya wanna come play in the snow?" The 2nd call was to my husband (to let him know what happened) 3rd call was to my sister in law to have someone come get the kids and their projects and get them to school. After that I sat and waited for Andy to come rescue me.

And rescue me he did. Granted the tow truck got pulled a truck length and a half backwards before it caught and started pulling the van out of the ditch, and things got wobbly to the point I was asking the Lord to send angels to help hold things up and push the van out! Eventually my van was on the road again, but it had to be towed back to the shop there was some minor damage to the front and underside and he wanted to make sure nothing was leaking. I'm so thankful to have friends with tow trucks that let me call them at 5 to 7 in the morning to come rescue me!

When I finally got to the school, the Allstate agent gave me a tiny match box car tow truck to commemorate the events of my morning. I knew I needed to alter it a bit to give to Andy. A quick paint job (with red nail polish) and a few strokes of my label maker Altered the matchbox car to match Andy's truck and then I had to mount it and make a trophy fit for a hero!


Supplies used: "allstate" matchbox car, brother label maker, red nail polish, wood block, yellow and black cardstock (paper adventures) , toy trophy, Glue dots, Xyron X-machine and 510.

P.S. I was informed by Andy's wife that not only did this make his trophy shelf BUT it brought it with him on Sunday to show his son :)

Wednesday, January 25, 2012

Knit together...

So I wanted to learn to knit. I "kinda" taught myself several years ago. I mean "kinda" cause I only taught myself to "purl" (hey it looks like knitting from the back side) and I never learned how to "cast on." I'm going to be spending several hours at a lab every other week with my mom so I wanted something crafty to do with my hands that could also be transported easily. Thus I decided to try to finally learn to knit.

My mom knits so I thought it would be a great time to learn. Today I brought yarn and mom brought needles and she taught me to cast on :) she then helped me with my stitches knitting wise. I stiil don't "knit" I only "purl" (apparently I taught myself backwards when I "learned" several years ago.)

Anyway that was one of the things we brought to do at the lab while mom got treatment today. (it was a 5 hour day)

So as I bumbled my way through learning how to cast on, there was a lady and her care giver (might have been daughter or daugher-in-law?) that were laughing along with my clumbsy attempts. She cheered me as I finally got the hang of it, then kept encouaging me as I got better with the knitting thing. Apparently she used to knit a long time ago. Well before she left she was telling the gal she was with..."You know, I should pull out my needles, I would love to make a scarf to match my hat" (she was wearing a hat someone had made her to keep her head warm during chemo) She left planning her project.

It was fun to inspire a fellow crafter (even with my bumbling attempts)


Here are my first few rows, I hope that it will look like a scarf when it's finished :)

Monday, January 9, 2012

Altered Tile

My mom always tells me her music is her prayer. So I knew I had to create something for her that said as much. This is a plain 12 x 12 tile. After trimming the paper slightly (I wanted to actually show the tile vs. just having paper shown.) I inked the edges first with gold then with "vintage photo". Then I grabbed my mod podge a sponge brush and went to town. I Mod Podged paper and the quote onto the tile and then added a couple of extra coats of Mod Podge for good measure to seal everything. To finish everything off I found this wonderful gold book stand that really accented the gold from the paper.

Supplies used: 12 x 12 tile, Patterned paper Autumn leaves (from 2000 yes 2000 is that considered vintage in the paper crafting world?), Ink, Ranger-Vintage Photo, Stampabilities-Gold, Cricut Cartridges- Jubilee, Plantain Schoolbook, Lyrical Letters, Base Camp, and Alphalicious. Mod Podge.

Sunday, January 1, 2012

Vintage Scarves


December is always busy for me. As the Childlren's Ministry Director of our church the beginning of the month is always spent getting ready for our annual Christmas Program. After that it's spent getting ready for the holidays! I made several of my gifts this year (and helped mom make some as well.) Mom and I spent a whole day (and part of another) making flower pins, ornaments, and necklaces out of vintage scarves. Here's a few photos of our day together (and a result of some of the work :) You will notice mom is busily sewing away while I in usual "craftastrophy" form got my finger stuck in the ornament and yes it is turning purple and yes I did stop to take a photo before getting the cold water to get my finger unstuck..LOL


Saturday, December 10, 2011

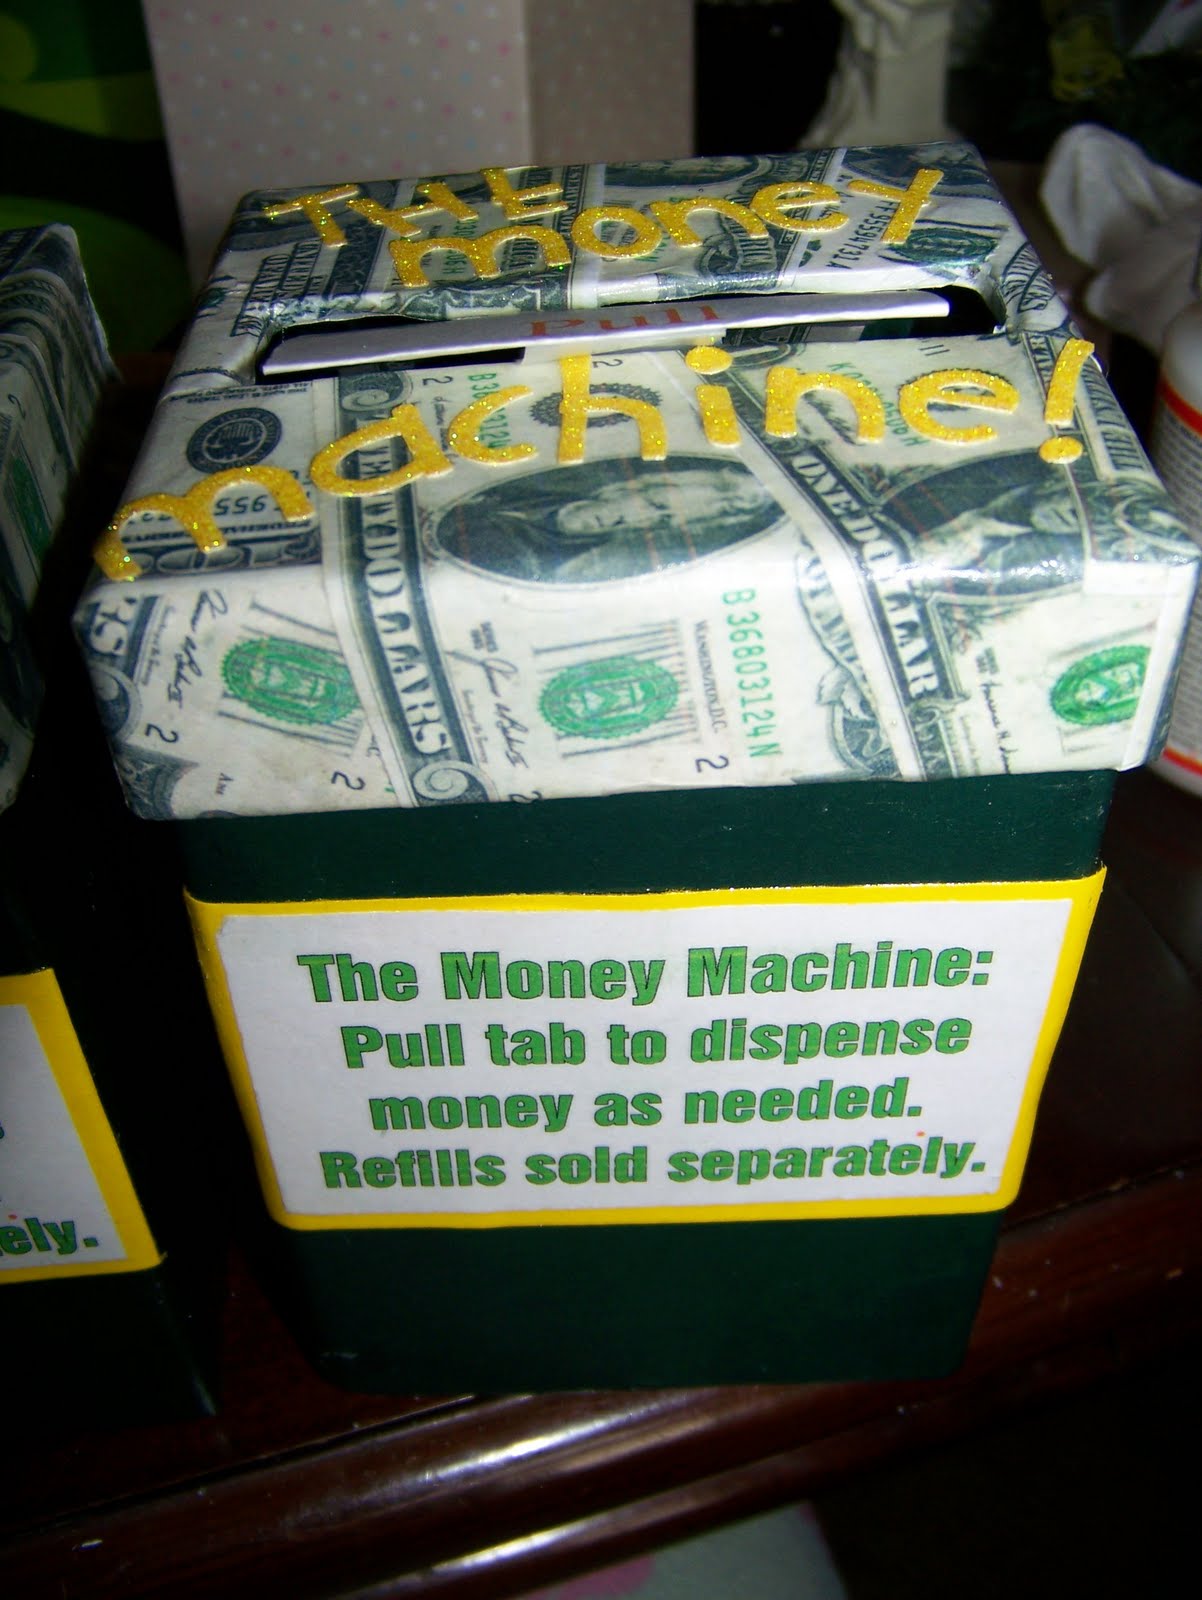
The Money Machine!

It's the season of giving!! I love finding the perfect gift for all the people on my list, but some people are just difficult to shop for or you just know a gift of cold hard cash could be most appreciated this time of year.

So enter in the need to find gifts for two very special ladies. One of them put together an entire government/constitution class for two of my kids (and 15 others) and the other opened her home to us to have that class for 12 weeks! The families of the students wanted to get together and bless these ladies in some way. After tossing around several places to give gift certificates to, it was decided cash would be the best gift and since I never want to just "give cash" I had to find a creative way to present it. So enter in

"The money machine"

I saw several of these "premade" boxes online ranging from $5 to $17 dollars (plus shipping) Thinking I could make something that would be much cuter I decided to try making my own.


Start by taping your bills together end to end (I used a small piece of tape on both sides for extra strength.) The "store bought" ones came with a roll of repositionable tape. I experimented and found the scotch "matte finish" came off the bills nicely (as long as the tape didn't over lap the entire edge of the bill.)

When your money chain is finished rolled up the bills and place in a box that will fit not only the roll but big enough you can cut a slit in the top to feed your chain through.

Never being one to want a "plain" box I decided to decorate mine some. I got out the Mod Podge, printed off some "play money" and went to town "Podging" the money onto the top of the box and adding the letter stickers when done. I gave it a final coat of Mod Podge to act as a sealer to make sure the stickers stayed in place.


I added some directions I created and printed off and then also realized I wanted some type of "pull tab" to thread through the top of the box so this I also printed off and then taped to the end of the dollar bill roll.

Then it was just wrapping them and waiting the agonizing couple of days till we could give them away!

Supplies used: Mod Podge, play money (images printed from online), letter stickers (stickabilities), Fiskars fingertip craft knife.


Saturday, December 3, 2011

Xyron Holiday Card Contest


So many of you know I am a bit of an adhesive "junkie" I love, love, LOVE the stuff. (Granted most paper crafting requires adhesive that might have something to do with it!)

My xyron machine is one of my favorites, and when I saw they had a holiday card contest and the only requirement was using your Xyron I was so in!


This is what I ended up creating:


Supplies: Cardstock-Prisim, Patterned Paper-BasicGrey, Fruitcake,
snowflakes,-Heidi Swapp, gemstones-Michaes,
Sleigh-Cricut, Christmas Cheer, Emobssing Powder-PSX, silver,
Ric-rac, Border punch-Fiskars, apron lace, font-Pristina,
letter stickers-TLC, funky. Adhesive-Xyron. 250 and 900, Glue Dots.


So if you would like to vote you can vote for my entry on Facebook here
Each comment or "like" is a vote.
 
I'm up against some amazing competition you can see all the entries here!