Showing posts with label Fiskars. Show all posts

Wednesday, April 13, 2016

Stamp and Scrapbook Expo 2016-Milwaukee Here We Come!

Plaid donated some amazing products!
It's that time of year again! Shoebox 1K will once again be sponsoring their "Basket Raffle Fund Raiser" at the Milwaukee, WI Stamp and Scrapbook Expo! This year we have 60 gift baskets being raffled off over $2000 in prizes!!!

Tickets are only $1 each~

Plus we have specials~ Buy 10 get 2 free and $20 gets you 24 tickets and a free gift!!!

So come visit us at the baggage check booth and pick up your tickets for your chance to WIN!

All money raised will go to help us send gift filled shoeboxes to kids in need all over the world through Operation Christmas Child


These are awesome!
Some of the 60 gift baskets being raffled off over $2000 in prizes


Shoebox 1K would like to thank our generous sponsors:


Monday, August 10, 2015

Scrapbook Expo- Schaumburg, IL


Come one, come all to the Scrapbook Expo Schaumburg, IL! There you will not only find fabulous paper-crafting items but you will find the fabulous basket raffles supporting Shoebox 1K/Operation Christmas Child!


This year we have 53 gift baskets to raffle off, all money raised goes towards helping us fill shoebox gifts for kids in need


You can support Shoebox 1K through the donation of supplies; Soap, washcloths, small toys, beanie babies, crayons, notebooks etc. Please nothing liquid, fragile or war related.

Tickets are only $1 each for your chance to win and you can win gift baskets from our fabulous sponsors:

Craftwell Inc, Creative Options, FaveCrafts, Fiskars, Mandie Wade-31 Independent Consultant, Artist Julie McGuffy, Creative Memories Consultant Karen McCorkie, Ken Oliver Crafts, Linnie Blooms, May Arts Ribbon, MD Hobby Craft, Michigan Scrapbooker Magazine, Peddler's Den, The Robin's Nest, Scrapbook Expo, Xyron and MORE!

Last year Shoebox 1K send 2129 shoebox gifts to children in Ecuador. This year the goal is 2500! Help us bless children in need!

For more information visit:  Scrapbook Expo

Saturday, February 7, 2015

Be My Valentine!

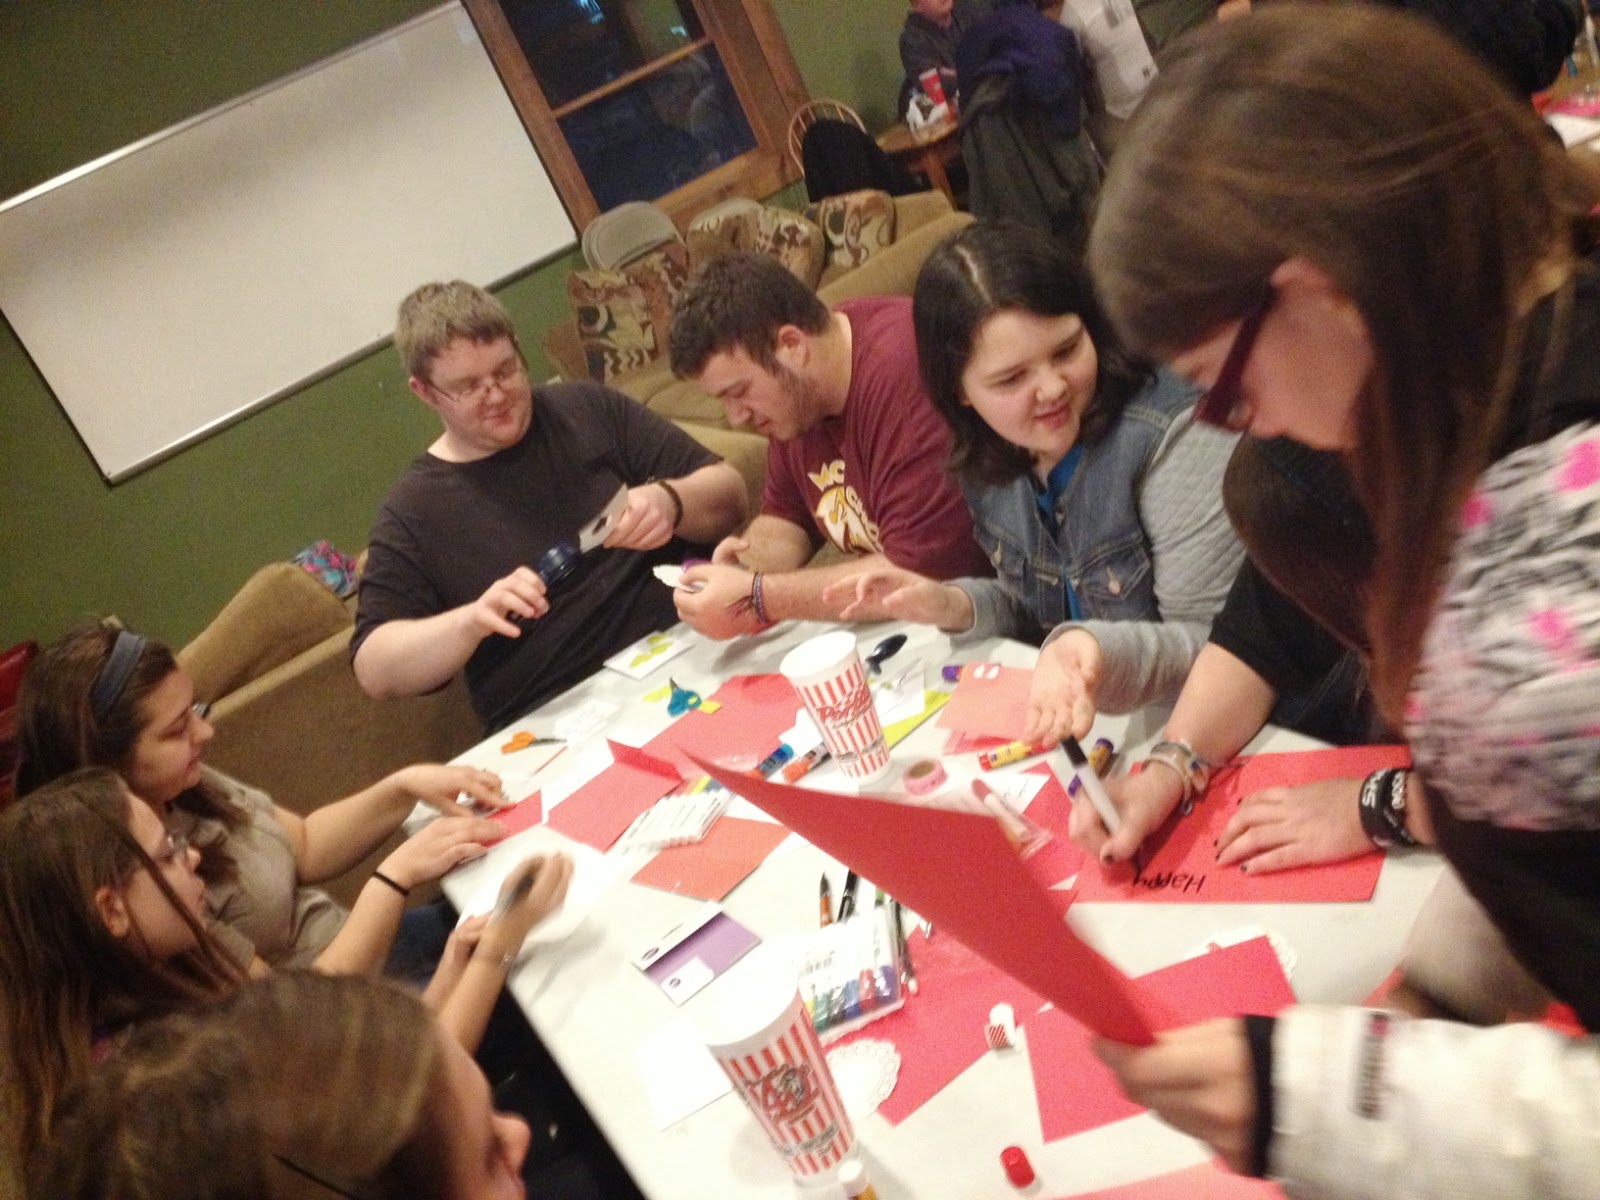
Volunteering at the local youth center I get to work with some amazing teens! When I get to bring my love of crafting to the youth center....it's like the best of both worlds!


Yesterday, I brought colored cardstock, some Fiskars Squeeze punches, doilies, Hampton Art Washi Tape and markers and let the teens go to town creating Valentines cards for our local nursing home and the local homeless shelter. Twenty-four teens and nine adults had a blast creating cards and talking about their "Valentine's Days" when they were kids.

They did an amazing job! I'm sure the residents will love them!


Friday, January 17, 2014

CHA Mega Show 2014-Top 20 Hot Product

To anyone in the craft industry the annual Craft and Hobby Association Trade Show is a cross between  a class reunion, creative escape, and exam week in college. Even though it is a lot of work, it is a lot of fun as well and I look forward to the show every year, not just for the creative side of things but this midwestern gal loves to be able to shed her layers of winter winter wear for a few days during the bitter cold of January for the warmer weather of Anaheim.

This year I attended the trade show as press representing both "Aim Happy" and Chicagoland Scrapbooker Magazine. Having "press" status allowed me in to a sneak peek event for the Top 20 Hot products being introduced at the show. Here are a few of the products that stood out for me. 


Air brush art was a pleasant surprise in the top 20. My friends from  Craftwell USA,  introduced their  "eBrush"an electronic air brush tool able to be used with paint, air brush make-up, etc. and also had a marker attachment designed for popular versions of alcohol markers on the market. For those not wanting to go with a professional model, Tim Holtz and Ranger Inc. introduced an updated version of a marker air brush, called the "marker spritzer" a plastic attachment with a balloon style pump, that will clip on to markers, allowing crafters to get a spritzed effect with their markers. 
The "marker spritzer"
The Tool-n-one a multi-purpose brush tool designed by Spellbinders to help those using intricate dies for die-cutting get all those annoying leftover pieces that get stuck in the die. Also at the event we saw upgrades to the "Crystal Katana" put out by the Crystal Ninja a tool designed to help with placement of individual crystals but also is great for placement of other small embellishments. 

Spellbinder's "Tool-in-One"

Having used molding putty before and having a box of used molds in my craft space, I was quite interested in a substance called "Composi-Mold" this non-toxic reusable molding compound can be melted and formed to create your mold to cast with, and then remelted down and reused to create an entirely different mold. It works with plastic, concrete, wax, plaster, soap and even edible treats! I talked to the creator for quite some time. He said the compound can be melted and recast 36 times. (He actually said he melted and recasted 37 times during product testing and decided to stop there because you "need to have a number" 


Fiskars showed off their new 12 x 12 Rotary Cutter, Ruler Combo. This rotary cutter had a 12 x 12 clear plastic grid ruler to allow sewers to measure and cut multiple layers of fabric in one step. Also of interest to me was the "Little B's" perfect positioner. A sticky mat designed to give manual die cutters a surface that will hold paper and dies in place so they don't shift during the cutting process resulting in a more accurate cut. 

For you marker enthusiasts the Chameleon Art Products "Color Tone" Pens were pretty amazing. Using a mixing chamber with a toner medium, from one marker you can get a full range of shade from lighter to darker, allowing for flawless blending in your coloring. 

The full list of the "Hot 20 Awards" as presented by the Craft and Hobby Association:

Craftwell eBrush: a portable airbrush system used by crafters, cake decorators and beauty enthusiasts alike for scrapbooking, makeup application and more.

Brother International Corporation ScanNCut machine: a revolutionary new home and hobby cutting machine with the convenience of a 300 DPI built-in scanner.

Spellbinders Tool-n-One: a portable tool that performs multiple craft functions, including piercing, folding, paper removal, inking, distressing, curling, and more.

Beadlon Artistic Wire Findings FormsTM: patent pending fixed peg jigs that allow you to make your own findings from a range of gauges of Artistic Wire and Beadalon German Style Wire.

Beadalon Knot-a-Bead™: patent pending desktop knotter tool to tie knots naturally with two hands for professional-looking jewelry.

BIC® Magic Marker® brand Window Marker: high quality marking and drawing tool designed to adhere to glass surfaces resulting in bold, vivid marks for window or glass writing occasions.

Chameleon Art Products Ltd Color Tones Pens: pens for creating art effects, including 3D and airbrush, smooth transitions, highlighting, shading, blending and gradations.

ComposiMold PowerMold Modeling Compound Push Mold Kit: make push molds of objects and textures from Modeling Compound castings.

CrystalNinja.com Crystal Katana: a patent-pending rhinestone and crystal pick up tool that picks up paper, embellishments, nail art, multimedia items and Swarovski Crystals.

DecoArt Chalky Finish Program: a complete program offering paint, waxes, varnishes, stain blocker, brushes and stencils that easily achieves a vintage, time-worn look for home decor and furniture pieces.

DESIGN MASTER TintIT™: multi-use transparent dye that fabricates color from just one can.

Ellison/Sizzix Modern Surrealist by Marisa Pawelko: 20 Originals steel-rule dies that create fashionable clothing appliqués, cards, stickers, notepads, and locker décor for teens and preteens.

Fiskars Brands 12” x 12” Rotary Ruler Combo: a rotary cutter with a ruler attached for measuring and cutting multiple layers of fabric easier.

ICE Resin Susan Lenart Kazmer Iced Enamels®: makes torch-fired or kiln-fired enamels with no fire required.

iLoveToCreate Aleene’s® Quick Dry Fabric Fusion®: an easy alternative to a needle and thread, remains durable and incredibly flexible, wash after wash.

ImpressArt Soft Strike™ Metal Stamping Blanks: A collection of metal discs specially made for metal stamping making it easy for metal stampers to leave deep, clean impressions and achieve professional results.

Little B Perfect Positioner: a unique adhesive mat designed for any die-cutting tool platform and any thin metal dies -- never waste a piece of paper again.

Lumi Inkodye Black: a sunlight-activated fabric dye that allows you to print your own photos onto fabric -- now available in black.

M-D Building Products Metal Sheets: perforated metal sheets, magnetic chalkboards, metal tools and other unique metals to add more dimension to craft projects.

Plaid Enterprises Mod Podge Mod Melter: a tool used to fill the Mod Molds with the Mod Melts. It allows the crafter to fill the molds with ease for molded embellishments, home décor, paper crafts and more.

Ranger Industries Tim Holtz® Distress Marker Spritzer: the perfect tool for creating airbrush effects on craft projects.

About the Craft & Hobby Association The Craft & Hobby Association (CHA) is an international nonprofit trade association consisting of thousands of member companies engaged in design, manufacture, distribution and retail sales of products worldwide in the U.S. craft and hobby industry. For more information about CHA, membership or its award-winning CHA Conference & Trade Show, visit http://www.craftandhobby.org.


Thursday, May 10, 2012

Scrap Challenge the sequel

So when I made the shadow box canvas I had a piece of canvas left over from where I cut out the canvas to form the shadow box. I saved it because it was a nice piece of mod-podged canvas and knew I could figure out something to do with it. Today in the midst of my second round of using your scraps challenge I decided what to do with it. Since it was sturdy and covered in music, I figured it would be a good basis for a book mark for my violin playing girls.


 I pulled out my Fiskars Ultra Shape Express and my
 Journaling/Bracket template and cut out a couple of shapes and then used a smaller template to cut out tabs to hold the book mark in place. Some ribbon thread through the hole punched in the top and then a quick monogram with some velum stickers. To finish them off I added a music note I punched out of vinyl. 

My daughters being not just violin players but avid readers LOVED the combination of their two favorite hobbies!

Supplies used: Canvas scrap, photo copied music, "antiqued"(Tim Holtz distress Ink-Vintage photo), Mod Podge, Ribbon, Velum Stickers-font wordsworth, black vinyl, Fiskars- Ultra Shape Express Journaling and Bracket Template, music note punch, Crop-a-dial.

Monday, April 23, 2012

Shadow Box Canvas

While I have never considered myself an artist, I do consider myself a crafter. I reserve the title of "artist" for those whose pieces I think belong in a gallery or hanging in the art institute. The interest in "mixed media art" has me fascinated. I love the painting and different textures and little accents and touches. It boggles my mind at how they can take so many different mediums and turn out a piece that looks so "put together."

Last  summer the Craft and Hobby Association's trade show had a focus on "Mixed Media Art." It made sense being that so many crafters have their hands messy with more than one art form. This being the case many of the vendors at the show, demonstrated how their products could be used in mixed media. I sampled and dabbled and tried them all. I had so much fun playing that I finally decided to jump in and try something new.

The phrase "pieces of my heart" kept drifting through my mind.  I envisioned hands tenderly holding cherished pieces of my heart. I know that I can't draw to save my life so I wanted my piece to revolve around a photo. I didn't want to just stick the photo to the canvas so I had the idea to shadow box the photo within the canvas.

Since a blank white canvas can be intimidating I started with a messy base coat of a creamy metallic colored acrylic paint, I then topped it with some music I photo copied and then distressed and tore up. I used Mod Podge to not only adhere down but to give the background a bit of a glossy texture. When it dried, I used my USX as a stencil to add a window in the canvas. Instead of using the USX blade with the template I used my Fiskars retractable fingertip craft knife to cut out the window. I then added a double mat frame using the same template I made the window out of to give me an exact fit. I used a transparency as my window glass to seal in the photo.


For the heart I wanted a kind of free form heart that somehow fit together, yet didn't but still made up the heart. Painted puzzle pieces fit the bill perfectly. For a caption I played around with different fonts of chipboard letters, edging some in gold and glittering others. To finish it off I added a touch of coordinating ribbon just cause I thought it needed a bit of movement along the side.


While I'm not sure the finished piece could "technically" be considered "mixed media art" based on today's standards. I was really pleased with my finished piece. It was fun to figure out how everything would fit together and dig through not only my paints, but my inks, metallic rub-ons, and papers, and even tossed in some photography as well.


Supplies used: 11 x 17 canvas, black art board, sheet music, chipboard-My Minds Eye, Rusty Pickle, Lil' Davis, photograph, old puzzle, paint-Plaid folk art various colors, Krylon Glitter Blast (starry night), Ink-Color Box Q Stack(chocolate and blueberries), Ranger Distressed Ink (vintage photo, tea stain), Metallic Rubons-Craft T (Set #2), ribbon-Stampin' Up!, Crafts Etc.,  Fiskars USX Template (Rectangle), Fiskars Retractable Craft Knife,  Mod Podge, Xyron 900, Glue Gun, Glue Dots, Staples.

The perfect gift


Growing up was an adventure. Mom was a single parent raising two daughters on a modest income so we learned to not just improvise but create what we didn't have. Being a school teacher, mom made sure we were never short of crayons, and paper and pens. Having the initial desire to go into commercial art we were never short of art and craft supplies as well. 

My sister and I were constantly "making things." Doll houses out of boxes, paintings, finger weaving, I even recreated "Charlotte's Web" in my bedroom-granted it was connected to the dresser, and the bedpost, and the table, and the desk. My goal was to be able to crawl across it to get to things in my room. (It didn't work.) Mom helped us with school projects and making costumes and doll clothes. 

Mom also filled the house with music. Having played the viola through college, mom loved classical music and wanting to rekindle that flame took the instrument up again when I was young.  For my sister and I this led to music lessons of our own. Piano, flute, and bells for me. Oboe, Bassoon, and Cello for my sister, plus both of us were in choir and enjoyed singing. 

Our faith was also a big part of our lives. Mom was active in our church serving as Sunday School director, a member of the alter guild and vestry. Because of mom's involvement, my sister and I were acolytes, worked in the nursery. I even led the Jr. High youth group when I was older. But my mom's faith was more than just being active in church. My mom believed that what she did with her talent was a gift back to the Lord. She one time shared with me that even her music was her prayer.

So much of whom I am is because of my mom naturally the news we received in November was earth shattering; the cancer had returned, in her spine. They gave her 4-6 months without treatment 6-8 with.  I walked around in a daze, I think we all did, just letting the news sink in. I know none of us are guaranteed our tomorrows but to be told someone you love is even closer to death is devastating. 

After I came to terms with that news, another realization hit me…this might be mom's last Christmas with us! What do you get a person that means the world to you when this might be the last present you ever give them?!?

So I started really thinking about who my mom is, what she has taught me, and what she means to me. I knew I had to make her something (she loves handmade gifts) I also knew I wanted it to revolve around her music and maybe her faith as well. 

I rejected one idea after another and then I found "IT" not just any it, but the most gorgeous violin paper. I was at a craft warehouse sale and found two sheets of Autumn Leaves paper from 2000. (11 year old paper in the paper world is probably itself considered vintage.) 
I knew this was to be the foundation of my mom's Christmas present. Looking around the sale I found some 12" x 12" tiles and I knew a decorative tile was in the making.


I wanted the emphasis to be on the violin and the quote I chose so I kept decorations down to a minimum; antiquing the edges of the paper with ink then adding a touch of gold here and there. Using Mod Podge I adhered the paper to the tile and then added the quote I cut out with my die cutting machine. Another layer of Mod Podge to seal everything in finished off the piece. 
To display the tile I found a gold book easel that coordinated with the gold accenting the violin. I loved the way it turned out. The project itself was simple to do but the results were very elegant. The end result was a gift for my mom that was totally "ME." Something handmade from the heart (which she loves) and something that celebrates not only her music but her faith.

Needless to say she loved her gift. She even cleared off a spot on the piano to display it. It has even become the focal point when she teaches viola. While trying to get her students to add more emotion to their music she says, "read that," (pointing to the tile,) "now pray with your music."  So the decorative tile I created for her even helps her to pass on her musical legacy as well.


Supplies used: Supplies used: 12 x 12 tile, Patterned paper Autumn Leaves, Ink, Ranger-Vintage Photo, Stampabilities-Gold, Cricut Cartridges- Jubilee, Plantain Schoolbook, Lyrical Letters, Base Camp, and Alphalicious. Mod Podge

Sunday, April 22, 2012

Earth Day!

Happy Earth Day!

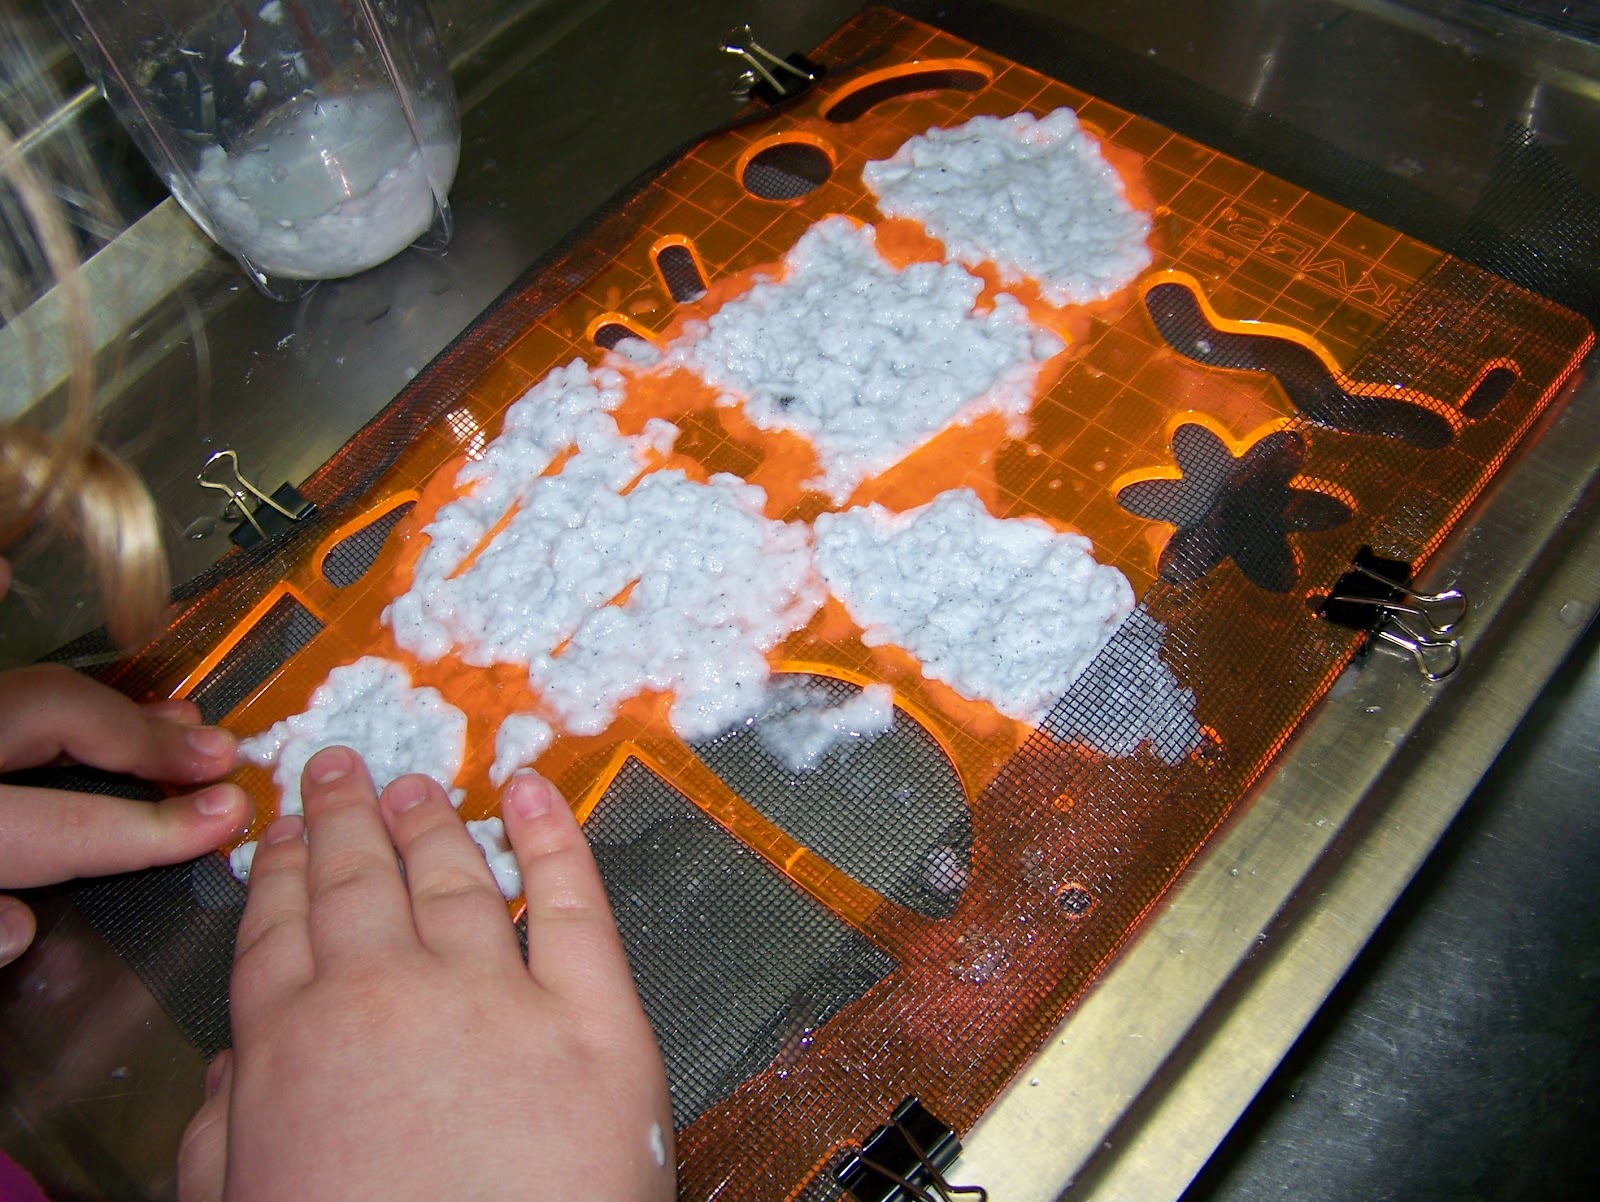
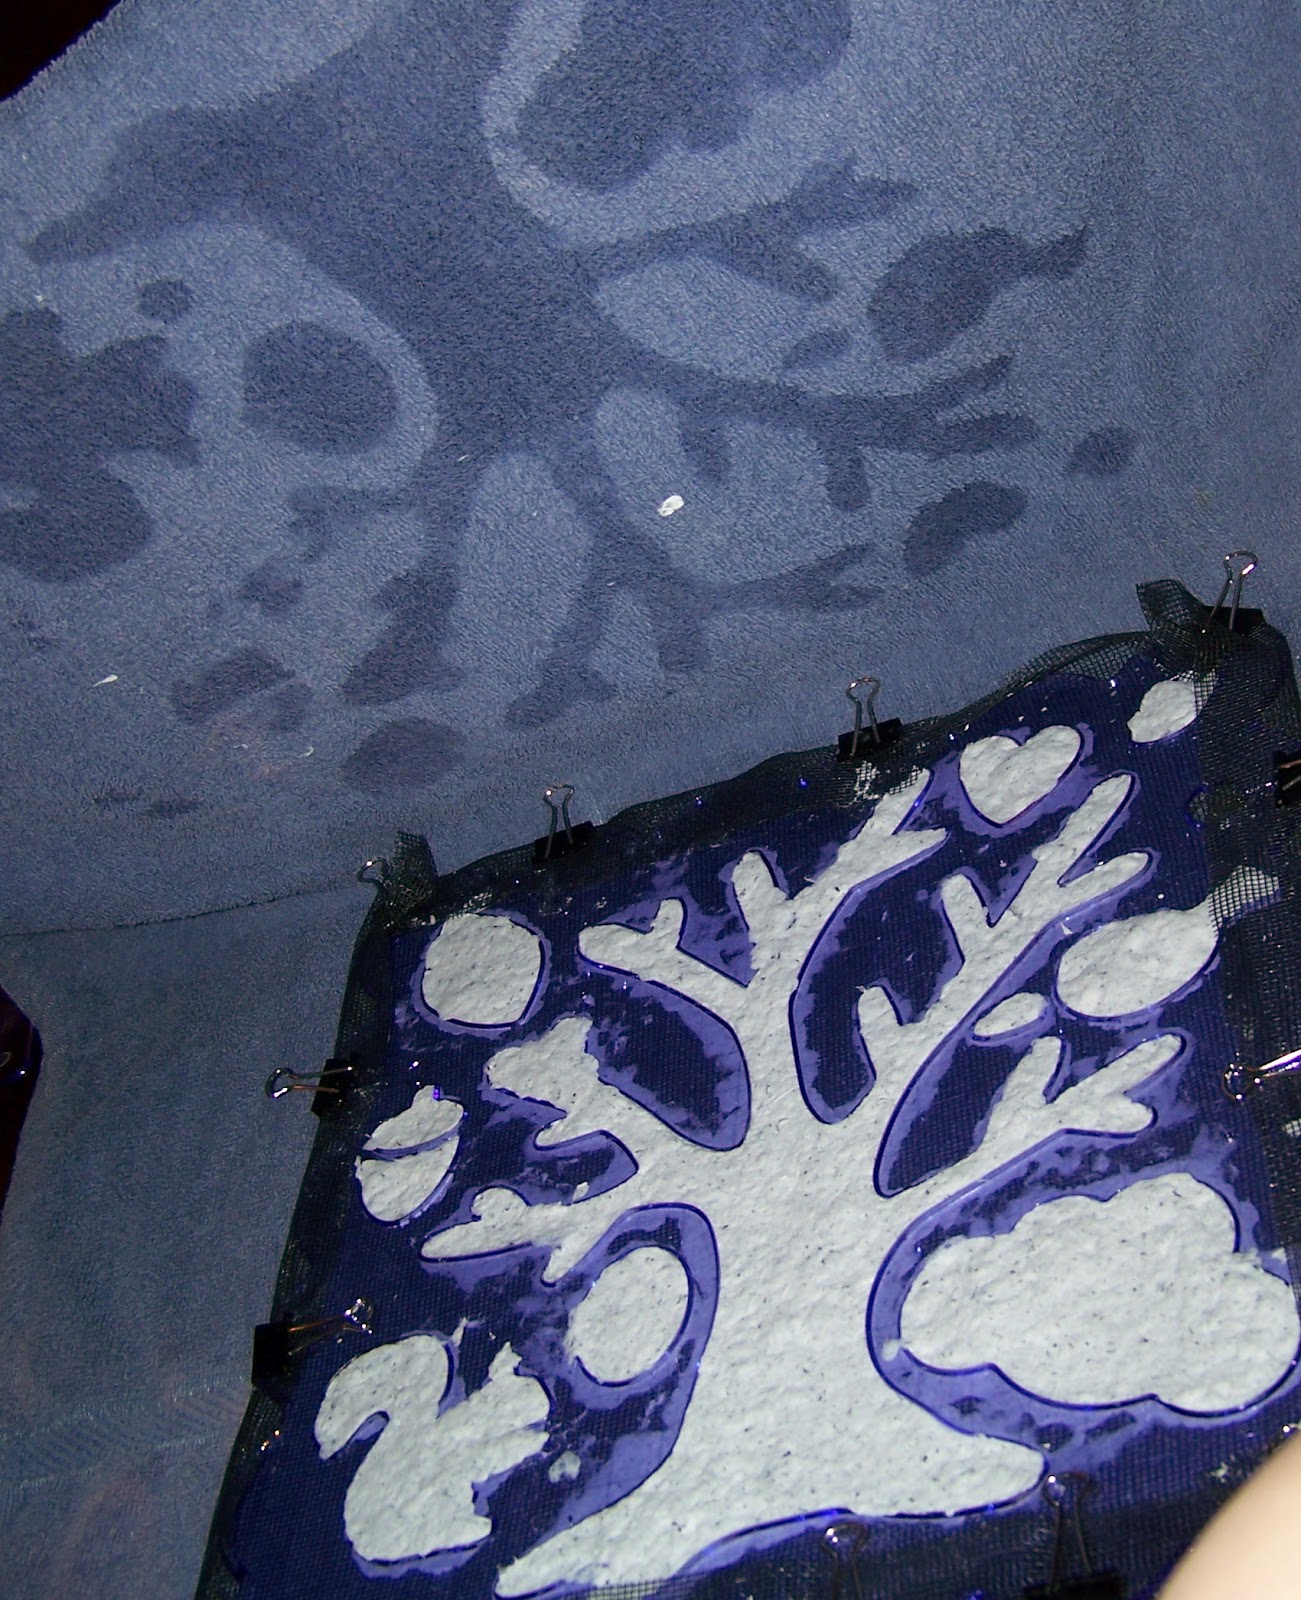
In the spirit of Earth Day I decided to try and "recycle" our old paper into new. Having experimented before with handmade paper, I wanted to try something a bit different. I wanted my paper to be shaped, yes I know that I could just make the paper and then cut it out, but I wanted it to be a bit thicker and have more definition along the edges than a typical die cut, not to mention texture. So I decided to try and make a paper mold and deckle using my Fiskars  USX Shape Templates.

Supplies needed:
Old paper-anything without a glossy coat works, copy paper, newspaper, paper towel etc.  Traditional card stock works as well but I found the heavier paper needed to soak in water for awhile before the blending in step 2.

Screen- if you have an old screen you can cut that up or pick up some inexpensive household screen at the hardware store

Blender
Bowl
Water
Towels
Binder Clips
USX template of choice (I used woodland tree, and cupcake)
cookie sheet

Optional: rolling pin

Step 1: Tear your paper up into 1 inch squares, place into a bowl with enough water to cover the paper allow to soak.


Step 2: In the meantime create your mold and deckle. Your mold is the screen that what you paper will be created on. The deckle is the edge that will shape the paper in this instance you are going to use your USX template. Take the screen and attach it firmly to the template using the binder clips. Pull tightly as you don't want there to be space between the screen and the template. I found there is an edge to the templates and therefore you will have less seepage if you flip your template upside down. This will help prevent some of the seepage that naturally occurs.


Step 3: Using your blender, add a couple of handfuls of the wet paper and then enough water to blend easily. This will be kind of trial and error depending on how heavy your paper is. The thicker the paper the more water you will use. BUT the more water you use the longer it will take your paper to dry. To start try about 4 cups of paper scraps to 2 cups of water. Blend until the paper pulp starts to look like wet cotton.


Step 4: Fold up a towel and line your cookie sheet with it. Place your USX mold and deckle on top of the towels. Using your hands fill the shape with the paper pulp packing it in. Make sure you not only fill the corners but that you get an even layer of pulp. If some spots are too thin it will cause your paper to either loose shape or tear easily.


Step 5: Once you have a nice thick layer of pulp, start working the water out of the paper. To start you can use your hands, as it gets drier you can even place an additional towel on top and use a rolling pin to work out water. Change the towels as necessary.


Step 6: Allow to dry. Depending on the thickness of the paper, moisture in the pulp and air this can take anywhere from several hours to a day or longer. If you wish to speed up the process and don't mind your shape a bit "flatter" you can carefully un-mold your paper and use an iron on it. Be careful to press firmly down without shifting. Like any paper it tears easily when wet.

Step 7: Remove your paper mold. You may notice some rougher edges if pulp seeped under the edges, this is easily removed with scissors or a bit of sand paper depending on the thickness of your paper.

The finished paper has the feel and weight of an egg carton.Your shapes can vary in thickness anywhere from a heavy textured paper to almost a paper clay texture that is the thickness of chipboard depending on how thick you applied the paper pulp.

The paper you have created is fun to ink as the texture of the paper pulp provides an interesting texture.


As of this writing my tree was STILL drying, but my squirrel was dry as was the acorn so I decided to create this card:


"Nuts About You"
Supplies used: Fiskars USX template-Woodland Tree, Cardstock-Bazzill, Patterned Cardstock-Fancy Pants-Childlike, Ink-ColorBox Q stack( Chocolate and Blueberries), Fiskars LED Rotary Trimmer with straight and deckle blades, gemstone, Metallic Rub-on-Craft T (Set #2), Stamp Font- Embellish It (Basic Type,) glue dots, glue glider perma tac.

Tuesday, March 27, 2012

Thank you cards

I had a couple of thank you gifts to give to friends and wanted cards for the group to sign. Both of the friends the cards are going to are the "crafty" type so it's fun to create for them!


To save time both cards have a similar design. I have a layered base, with a left hand border, then layered bling flourishes, flowers and a butterfly accent. The one on the right needed a bit more so I raided the silk plant off my shelf for a couple of leaves as a filler.  The sentiment was simple, a message stamped out on strips of paper and tucked under the flower with glue dots. To finish it off, I added an extra touch of elegance with a punched edge on the envelope. (I had to make my own to accommodate the chunky embellishments.) 

Supplies used: Cardstock- paper adventures, patterned paper-GCD Studios Brave Girl collection, Ink- ColorBox, bling flourishes and flowers and prima, butterflies-altered chipboard embellishments GCD Studios, Glitter flourish border-GCD Studios, Flower ribbon trim-May Arts (Satin Cutout), leaves from my silk plant ;) Additional tools-Score Pal , Fiskars Apron Lace border punch.

Both gals loved their cards, and my "happy crafty moment"-one of them has her's on permanent display at her house. I love it when people really not only appreciate what I make them, but love it as well! It's good medicine for my crafty heart!