Showing posts with label vintage. Show all posts

Friday, February 15, 2019

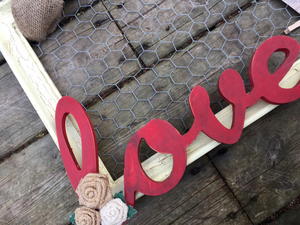
"Love" chicken wire photo display

I loved this project I created for my son and daughter-in-law and it's always fun when others agree with you.  I just found out that this pattern is featured in "8 Old Picture Frame Crafts" by Fave Crafts. Be sure to stop by there and check out my project and all the others in the collection.  

Looking for a fun way to display photos with a vintage feel. Creating this rustic, chicken wire photo frame is a cinch with Plaid Craft paint and finishes. 


Materials List:

Wood Frame (purchased from thrift) 
Plaid Crafts Folk Art Metallic Acrylic Pure Gold 
Plaid Crafts Folk Art Chalk Paint-Bavarian and Tuscan Red 
Plaid Crafts Folk Art Crackle Medium 
Plaid Crafts Folk Art Antiquing Wax 
Plaid Folk Art Paint Brushes 
Chicken Wire 
Protective Gloves 
Wire Cutters 
Needle-Nosed Pliers 
"Love" wood cutout 
2 yards of 3" Burlap Ribbon 
Burlap Flowers 
Wood Clothespins 
Soft Cloth 
Scissors 
Hot Glue Gun/Glue Sticks 

Instructions

  1. Remove picture and glass from frame if necessary, Clean frame well. Paint Frame with Plaid Crafts Folk Art Metallic Gold Paint and allow to dry. When dry, using paint brush, cover frame with Folk Art Crackle Medium using even brush strokes, be careful not to overdo it. The thicker the coat the thicker the crackle. Allow to dry. Apply a top coat of Home Decor Chalk in Bavarian. As the paint dries the cracks will appear.
  2. While frame is drying paint the word Love with a coat of Plaid Crafts Home Decor Chalk Paint in Tuscan Red allow to dry. When frame and "Love" are dry, apply a coat of antiquing wax over the surface of both using a brush. Use a soft cloth to buff away the excess and bring to a sheen.
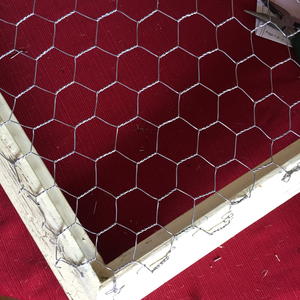
  3. Turn frame over and measure the chicken wire to cover the back opening. Trim as necessary using wire cutters. Be sure to wear protective gloves. Secure chicken wire in place on back of frame covering the opening. Secure chicken wire in place with staple gun. Turn sharp edges of wire under using the needle-nose pliers.
  4. Face the frame front again, Glue the word love in place. Embellish as desired with burlap flowers. Run a loop of Burlap Ribbon through the top of the frame and chicken wire on both sides and tie in a bow. Trim ends if desired with scissors.

  5. Use clothespins to secure photo (s) hang frame by bow.

There you have it, a cute way to display some favorite photos! I especially like the photo I have selected as this is my son and new daughter-in-law! 

A special thanks to Plaid Crafts for providing the paint and finishes for this project!

Sunday, December 16, 2018

All that Glitters!

For the past couple of years I have been collecting old jewelry. Pieces from thrift stores and garage sales, antique stores and things given to me by family, have all found their way into my collection. The goal of the collection was to make a wall hanging out of the jewelry.

This project has been sitting in bits and pieces on my desk for about 2 years, and since I had some extra time the last few days so I  decided to finish it and just in time for Christmas!

After cleaning the pieces, I removed the pin backs and post if necessary, some of the pieces came to broken, so a little E-6000 was used to replace the gems. 

Try to remove pins and backings as close to the piece as possible, this will help the jewelry to adhere flat to the fabric.

Using a piece of black velvet for the background, I outlined a basic shape with masking tape on the velvet. I also used masking tape to secure the fabric to my cutting mat, because the fabric was slippery this just helped keep things in place. After figuring out the basic placement, I used hot glue to attach the jewelry to the fabric. 

Looking at all the pieces is like a game of "i-spy" 


The fabric was then attached to a board. I originally wanted to add lights to the piece, tucking them in from behind, but due to my Facebook opinion poll, decided against it. (26 to 11 in favor of no lights and three suggestions of gallery lights and one vote for a disco ball from my daughter. )  After the fabric was attached I used glazier points from MD Hobby and Craft to secure the wood into the frame. 

Insert the points parallel to the piece using a flathead screwdriver to wiggle into place, if you are having trouble a slight tap with the hammer helps. 
Because of the weight of not only the jewelry but the wood I attached the fabric too, I didn't want the frame to carry all the weight, so I attached a simple wood support frame to the decorative frame. 

You can see the holes originally drilled for lighting.

I love the finished project!


 I do agree it needs light to bounce off the jewelry to give it some added sparkle, but am glad I didn't embed lights as I think it might detract from the beauty of the jewelry itself. I still might add some type of gallery light but probably not the disco ball my daughter had in mind ;)

I pray all of you have a wonderful holiday season, and a very Merry Christmas!!!


Supplies used: Vintage jewelry, Velvet fabric, wood,  E-6000, MD Hobby and Craft Glaizer Points, Screwdriver, Hammer, Drill, Screws, AdTech multi temp glue gun, pliers, cutters, button shank remover


Friday, March 25, 2016

Key Cabinet

I am so blessed to be a part of a wonderful group of bloggers associated with Prime Publishing. This past January we were invited to a fabulous blogger event during the Craft and Hobby Association Trade Show. At this event we mixed and mingled with some amazing manufacturers all wanting to send us product to create with! 

Once again there was a contest involved, and with my mind awhirl I set out to create. 

I always am loosing my keys, which is really kind of funny because I LOVE collecting vintage keys so I thought how cool would it be to create something fun and functional. Taking a wood tray and frame from the thrift store, I set out to upcycle them into an adorable key cabinet!
Instructions:

Remove glass from frame and hardware if necessary. Lightly sand all wood surfaces.

Apply base coat of paint (the color bamboo shown) and allow to dry.
Base Coat

Apply crackle medium on all wood surfaces. Use smooth strokes. The thicker the coat the deeper the cracks when finished. Allow to dry.

I opened my paint to find it smiling on me
Apply top coat of paint (Ceramcoat Chalk in Raven shown.) Use long smooth strokes for best results, allow to dry. 

Just like that the magic happens!
Brush on Ceramcoat wax to entire painted surface allow to dry and then buff with a soft cloth. 
Cut 4 pieces of metal ribbon slightly longer than inside opening of of frame. Lightly sand and then rub on Stazon ink and wipe immediately off. Ink will settle into recesses of the ribbon and grooves made by sanding to give an "aged look" Heat set in being careful because the metal gets hot. Staple metal ribbon in place on back side.
**Pausing for a moment to say this metal ribbon is AWESOME!!! It comes in several widths, has fabulous detail both embossed, and die cut. It's heavier than foil, but not as rigid as tin. I've only seen it at Hobby Lobby in the spool ribbon aisle by the wedding stuff. $4.99-5.99 a 9ft roll. 
Cut wire mesh to cover the backside of frame. Using staple gun, staple into place.


Cut burlap to fit inside wood tray, using a brush, apply Fabric Fuse to inside of tray, glue burlap to inside of tray, smoothing out fabric. Slightly fray edges of burlap if desired. 
Trying to get the keys to hang straight

Line up frame with wood tray, Making sure to center frame over wood tray. Using drill, install hinges so the frame becomes the door of the cabinet. 
I found out after the fact
do the burlap before the hinges!
(Messing up first so you don't have to!)


Install knob to front of cabinet, install latch to close, on side of cabinet.
Install cup hooks inside cabinet to hang keys, install hangers on back of cabinet to hang on wall. 


Volia' an adorable key cabinet! Hopefully it will become not only a place to store the vintage key collection, but a place to remember to put my keys (where I can see them!) 

Notes:
When working with the crackle medium, a smooth thin coat will produce tiny cracks, a thicker coat will produce cracks that are wider exposing more of the undercoat. Remember to wear protective eyewear when cutting the wire mesh, the tiny pieces fly everywhere. Use a drill to predrill holes for hinges especially on softer wood (or particle board.) This will help keep the wood from splitting.
Supplies used:

Plaid Delta Ceramcoat Chalk Paint-Raven, Plaid Delta Ceramcoat Select Multi Surface Satin-Bamboo, Plaid Delta Ceramcoat Crackle Medium,
Plaid Delta Ceramcoat Wax-Clear, Wood Tray (from thrift store), Wood Frame large enough to cover edges of tray, Piece of burlap fabric to cover inside of tray, Therm-o-web Fabric Fuse, Hinges from hardware store, Wire mesh from hardware store, Staple Gun and Staples, Wire Cutters, Metal Ribbon enough to line inside of frame-Hobby Lobby, Knob-hardware store, Latch-hardware store, Paint brushes in assorted sizes, Cup hooks, Protective eyeware, Needle nose pliers, Drill and bits, Screwdriver, Heat Gun, Sandpaper, Black Stazon Ink

This project is in the "Best Blogger Craft contest" over at Fave Crafts! I would LOVE your vote!  You can vote once per day!

 http://www.favecrafts.com/voting/Blogger-Contest/