Showing posts with label Plaid Ambassador. Show all posts

Tuesday, September 1, 2020

Inspire Canvas

A simple flat panel canvas turns into an "inspiring" decoration with Mod Podge and some simple embellishments.


After creating a base layer of Mod Podged scrapbook paper, I layered the cut out shapes and the "inspire" wording. When dry, I added some lace trim and buttons. The finishing touch was the adorable charm I created using a Craft Fantastic Charm Tray. The flower charm was designed to be a necklace but I flipped it upside-down and hung the bird charm off of it. 

I loved the results and this canvas became a wonderful decorative touch to my craft area! 


**Please be advised that Plaid Enterprises, Inc. has compensated the designer by furnishing Plaid product at no charge in connection with this posting. 

Monday, August 17, 2020

Rya-tie -pom-pom ball.

Operation Christmas Child sends gift filled shoeboxes to children in need all over the world. National Collection Week is November 16-23. I love crafting for shoeboxes but like most I am busy so..
 I look for quick and easy craft projects to create for my shoebox gifts. While the staple items in my shoebox gift are “necessities” like school supplies and personal care items. I love adding toys that are sure to bring a smile to a child’s face!

I used to wrap yarn or t-shirt pieces around a cardboard form to make a pompom style ball, but when Plaid Crafts sent me their new Rya-Tie kit I knew I found an easier way.  The Rya-Tie was designed to makes tassels used to create a latch-hook style decoration, but the tool does more. It is a easy way to create simple pompoms that are fun for kids to toss around. When you wrap the long side you can create a larger ball, and wrapping around the shorter side gives you two pompoms for the same amount of work. These soft toys can be created in minutes and are a great items to include in 2-4 year olds boxes because they are easy to catch or put together a set of 3 or 4 and send some juggling photos/instructions printed from the web, and you have a fun gift for an older child. 

Supplies: 
1 Rya-tie by Plaid Crafts
2 rubber bands (comes with Rya tie kit) 
1 skein of “t-shirt yarn” or t-shirt yarn (Bernat Maker Home Decor Shown) 
2 Zip Ties
Strong scissors or clippers

Directions. 


You will be using your Rya-tie tool length wise. Place a zip tie long the top and the bottom of the tool.
Wrap yarn around Rya-tie from top to bottom holding the zip ties in place with the yarn.  The more you wrap the fuller your ball will be. With I found wrapping 300 times makes for 2 nice sized balls.

Place rubber bands around wrapped Rya-Tie, these will hold the yarn in place while you cut it. 

Cut the yarn down the cutting channel. first one side than the other. 

Close first one zip tie around the cut pieces and then the other. 

Fluff the pom-pom, snip ends to shape. 

To make one larger ball  rotate the tool 90 degrees and follow the directions above. 


Thank you to Plaid for providing the Rya-Tie tool kit and Bernat for providing the yarn

Sunday, December 1, 2019

Abide

"Abide" -This image has been rolling around in my head for awhile, at least a month or more.

 It started with a vine and then I saw a crown of thorns grow from the vine...and the Holy Spirit whispered to my heart "the crown of thorns was made from a vine as well."

 I was reminded of the scripture . "I always carry around in my body the death of Jesus, so that the life of Jesus may be fully revealed." (2 Corinthians 4:10 my paraphrase) 

Abiding for Jesus led him to a place of death, but he conquered death, and so that place of abiding produced the fruit of eternal life for all who receive.

 As a Christian I am encouraged to " abide in the vine" to draw my identity... my strength from God, to bear fruit of showing people the Savior. 

Some times that means laying down my wants and desires for God's better plan. My "death" to my self, to become resurrected as who He has made me to be and to bear fruit that will last.


(mixed media on canvas)
Supplies used: Canvas, Acrylic Paint, Mod Podge Ultra, Hot Glue, Paper 


**Please be advised that Plaid Enterprises, Inc. has compensated the designer by furnishing Plaid product at no charge in connection with this posting. 

Monday, November 11, 2019

No-sew Fabric Building Set

Operation Christmas Child sends gift filled shoeboxes to children in need all over the world. When packing your shoebox gift you decide on the age and the gender of the child you wish to pack your box for. Coming up with something new and different for boys shoebox gifts that doesn’t take up a lot of space is always a challenge. This simple fabric building set is a fun imaginative toy that allows kids to build “towers” and yet stores flat taking up little space, making it the perfect addition to a shoebox gift. 


Supplies: 
2- 8” x 20” pieces of fabric (cotton, or cotton poly blend) 
2- 8” x 20” pieces of  Therm-o-Web Ultra Heat and Bond Ultra Hold (Red Label) 
Iron
*Board
Scissors
Ruler/pencil
Template (if desired, see below)


# While the stabilizer is fusible, it is only a temporary hold, thus the need for the ultra hold permanent adhesive.

* a regular ironing board can be used, but due to the thickness of the stabilizer, I found a regular board and silicone mat worked best. 

Directions:

1) Prewash/Dry and iron fabric 

2) Using the board and the silicone mat as your ironing surface, lay first piece of fabric face side down, place the Ultra Heat and Bond adhesive side down on the back of the fabric. With your iron set to medium (no steam)  press the adhesive to the fabric for 2 seconds, repeat until the entire surface is covered. Don’t be tempted to turn up the heat to make the project go faster. If you overheat the adhesive as it will “melt”  into the fabric vs. adhering to the fabric. This is one time when it pays to be slow and methodical. 

3) Repeat with other piece of fabric

4) Lay stabilizer on your ironing surface. Remove paper backing from fabric. Fuse the fabric to the stabilizer pressing for 6 seconds, repeat until the entire surface is covered. Check to make sure the entire surface of the fabric is bonded to the stabilizer. 

5) Repeat with the 2nd piece of fabric on the other side of the stabilizer. Again heed the warning about being slow and methodical 

6) Using a ruler and pencil to draw guidelines or the template, cut fused fabric into desired shapes Simple ones work best. Squares, rectangles, triangles, hexagons etc.  no See the template for ideas or come up with some of your own. 

7) Cut “slits” into the pieces. A slight “wedge” shape can be used for ease of putting together. The wider end of the wedge should be towards the outside of the piece. Be careful when cutting out the slits that you don’t go past the 1/2 way mark. (See photo) 


To build- join the pieces by inserting one into another at a 90 degree angle along the slits.

If you are creating this to put into a shoebox gift.  Create a tower and snap a photo. Store the pieces in a large ziplock bag along with the photo to act as directions. 

Thank you to project sponsors: Therm-o-Web and Plaid Crafts for providing materials for this project

Please be advised that Plaid Enterprises, Inc. and Therm-o-Web,  have compensated the designer by furnishing product at no charge in connection with this posting. 

Project Template:


Monday, May 20, 2019

My Geeky Past, Present and Future-(Giveaway-Closed)


I've always wanted my own "Star Wars" introduction. 
(Find yours at Star Wars Intro Creator. )

My love of sci-fi began a long time ago in a galaxy far-far away! I remember going to the theater as a little girl and being transported into the world and never wanting to leave! And in some respects I never did. For Halloween that year my mom twisted my long dark hair into Princess Leia braided buns. When the boys of the neighborhood would play "Star Wars" I was the only girl allowed to play with--someone needed to be Leia. As a 12 year old my love of Luke Skywalker transferred to a full blown crush.  It didn't matter the actor Mark Hamill was quite a few years older...and married...with kids. My 12 year old heart still loved Luke I even cut out a mask of Luke found on a cereal box and had it taped to my wall next to my "Teen Beat" posters of Ricky Schroeder.

As I got older, my love of science fiction grew. I read Lord of Rings. The Dune series (yes I'm one of the few people I know that has read the complete series and seen the movie,) Doctor Who,  any superhero movie. I loved being transported to other worlds while being able to do the strange and impossible.

Creative Meets Geek!
My creative side would meet my geek side with the occasional Cosplay going "Steampunk" for a Youth Center costume party or helping the daughter become RiverSong, or one of the Doctors.
Love Steampunk!
The Doctor and some Weeping Angel Friends
Naturally my children inherited the dominant "geek gene" (thank goodness as my husband is not one) and love Sci-fi and role playing games and Cosplay. We even take some time to create fan art as part of our homeschooling!
Beginnings of a Doctor Who Gallery Glass

End Game Fan Art #Dontspoiltheendgame ban lifted ;)
That's why I'm excited to share that Plaid Crafts is launching Plaid Cosplay. Whether it's building cosplay, making terrain and painting miniatures for table top gaming,  or creating fan art and other geeky crafts. There will be a place for you!  To celebrate the launch Plaid is sponsoring a contest here on my blog!  You can win a prize pack valued at $50,  full of an assortment of Plaid Crafts paints, Mod Podge, and brushes.  To enter simply comment here on what you will create.
Win Me! $50 prize pack from Plaid Crafts
Want an extra chance to win? Sign up for my email newsletter!  Yay! I'm finally starting one!  The sign-up link is to the right! Launching next week I'll share more of what I'm doing in my many areas of creative life; craft projects and DIY to Operation Christmas Child shoebox crafts, prophetic art and even some fan art.  For those that might remember my old column "Crafting at the Speed of Life" from  Chicagoland Scrapbooker Magazine, look for a revival!  It's all about how my life collides with my art and vice versa! 

Contest closes June 2, 2019 at 11:59pm and is open to residents of the United States and Canada only! **Contest extended due to website technical difficulties.

Thanks Plaid Crafts for sponsoring the contest and be sure to stop by Plaid Cosplay on Facebook


Friday, May 17, 2019

Impress your teacher with a Money Machine!

It's been a long hard school year! But take heart the finish line is in sight. There's just a little hiccup end of the year teacher gifts. As a homeschooler, it seems kind of silly to give a gift to myself, (although I've been known to 😉) but my children do participate in cooperative classes at times and I need to find gifts for those teachers.

So enter in the need to find gifts for two very special ladies. One of them put together an entire government/constitution class for two of my kids (and 15 others) and the other opened her home to us to have that class for 12 weeks! The families of the students wanted to get together and bless these ladies in some way. After tossing around several places to give gift certificates to, it was decided cash would be the best gift and since I never want to just "give cash" I had to find a creative way to present it. So enter in

"The money machine"
 

I saw several of these "premade" boxes online ranging from $5 to $17 dollars (plus shipping.) Who wants to spend money to give money. So I tried making one myself. 

Supplies needed:
 Money- $1 are fun (because the roll is longer.) but any denomination of bill works.  
Reposition-able Tape- (Scotch- Matte' Finish)
Small Box
Scissors/trimmer
Craft knife
Fake Money- Or use fake/play dollar bill images printed from online.
Letter Stickers
Mod Podge-Plaid Crafts
Computer/Printer


To create your "Money Machine"
  • Start by taping your bills together end to end (I used a small piece of tape on both sides for extra strength.) The "matte finish"  tape came off the bills nicely as long as the tape didn't over lap the entire edge of the bill.
 
  • When your money chain is finished rolled up the bills and place in a box that will fit not only the roll but big enough you can cut a slit in the top to feed your chain through.
 

  • Using the craft knife, cut a slit in the top of the box. Then take your play/fake money and Mod Podge to the surface of the top of box.  Add your letter stickers. If you want a title on your machine.  I gave it a final coat of Mod Podge to act as a sealer to make sure the stickers stayed in place.


  • I added some directions on how to use the money machine that I printed out.  I also realized I wanted some type of "pull tab" to thread through the top of the box so this I also printed off and then taped to the end of the dollar bill roll.


Then it's wrapping your gift and "patiently" waiting for your favorite teacher to open!

Thursday, April 25, 2019

Second Place


After a long week plus of voting the results are IN. I am excited to share that my "Fabulous Faux Stained Glass Table" won 2nd Place in the 2019 Best Blogger Contest sponsored by Fave Crafts!


To see the full tutorial check it out at Fave Crafts---> Fabulous Faux Stained Glass Table

A HUGE Thank you to Plaid Crafts for sponosring supplies for my project as well as Deflecto Craft, Leisure Arts, Marvy Uchida, Rinea, Yarnspirations, StyleTech Craft, Xyron  FaveCrafts/ Prime Publishing LLC for hosting and sponsoring the contest. Congrats to all the winners! There is a lot of talent in that group and they inspire me to do more than I thought I could!


Tuesday, March 26, 2019

Polka Dot Trinket Tray

Welcome to Expo International's "Hello Spring" Blog Hop
 celebrating National Craft Month


Expo International  sent me a wonderful packet of trims to create with. My first reaction when I saw them. "Wow I can create all kinds of fun trinkets with these trims!" But what happens when you have trinkets? You need some place to put them. So I started out creating a fun trinket tray.


Supplies Needed:

24"-Lorlana Baby Pom Pom Fringe Trim (White)
12"-1/8" Rayon Mini Rick Rack (Aqua Blue)
1- small glass plate, 6-8" in diameter
1-small glass pot, 3" in diameter
Plaid Crafts Folk Art Enamel Multi-Surface Paint (Aqua)
Plaid Crafts Folk Art Tools Detail Painter (Large)
paint brush
E-6000
optional: oven


To Make: 
  1. Wash and dry glass pot and plate. 
  2. Using the paint brush, paint glass pot, covering entire surface.
  3. Use the large detail painter to add random polka dots to the plate.
  4. To set paint permanently: Either allow paint to cure for 21 days OR allow paint to dry 1 hour then place dishes into a cold oven,  allow oven to reach 350 degrees,  bake for 30 minutes, turn off oven and allow dishes cool before handling. 
  5. After dishes have cooled use E-6000 to glue Mini Pom Pom Trim to inside of the rim of glass pot with pom-poms facing up. Glue Mini Pom-Pom trim to the outside of the rim with pom-poms facing down. 
  6. Glue the rick-rack between the rows of pom-poms. 
  7. Glue decorated pot to the plate allow to dry. 


Additional  Expo International trims used for "trinkets":

Full tutorial on "trinket" projects coming soon! 


How would you like to win some fabulous trim for yourself? 
Visit Expo International on Facebook or  Instagram for details on how you can enter. 


Be sure to visit the other fabulous projects on the hop!


Wednesday, March 13, 2019

Of Lent and Another's Art

I love when two worlds collide. I work for a Lutheran church in a neighboring town. The season of Lent is upon us and the pastor wanted to do something different for the community. 

In her words: 
 "Lent is a time in the church year that we take time out for reflection. It’s a season of quiet, somberness, and introspection. It’s the dark before the light of Easter. Our lives are so busy sometimes it’s difficult to carve out time for Lenten practices. So this year at Peace, every Wednesday from March 13th and ending April 10th, the sanctuary at Peace will be open from Noon until 7:00 pm for a Self-Guided Lenten Journey.   
Each week, 3 stations of the cross will be displayed with artwork, music, and a self-guided devotion. Peace has obtained permission to use prints of art created by artist Lynne Kiefer Kobylecky. Ms Kobylecky’s work is on permanent display at the Trappist Monastery in Carlton, Oregon and her work portrays the last hours before the death of Jesus. Each station will have a scripture reading and prayer, along with the artwork display.  
All are welcome to come during the open hours and stay as long desired. On the fifth week on April 10th, there will also be a station concluding the journey with candles for a time of meditation." 

 The original pieces are hanging in a Trappist Monastery in Oregon. They are sculptural images, so the pieces are three dimensional.  Pastor Lu wanted to showcase this artwork and provide a meditative atmosphere. I was asked to help showcase the art. After finding out Pastor Lu's vision, I went to work using my "art" to showcase another's art!

We had permission to create photo prints of Lynn's artwork, but due to the file size of our originals the largest we could print was 8 x 10. After printing out matte photos of the artwork, I attached them to 8 x 10 canvases. Before attaching the photos,  we sponged several different colors on the sides and edges of the canvas choosing colors similar to our photos to give the illusion of textured stone. 

The canvases were then attached to foam core board. The boards were placed into frames that we had antiqued black with goal crackle. Because each photo is a station we need to designate the stations. To do this we created 2 x 2 mini canvases using the same color scheme as the larger canvases and masking numbers to designate stations. The display turned out reminiscent of pieces in an art gallery. Exactly the look that was hoped for.  

Three stations of the cross will be on display each Wednesday during Lent. The church has Gregorian Chanting playing softly in the background and a prayer and scripture guide accompanies each piece. People are free to come sit, kneel or stand as long as they desire. The whole atmosphere of the display allows participants a place of quiet reflection to prepare their hearts for Easter.


If you are in the Morris, IL area and would like to participate in the Self-Guided Lenten Journey. It is happening at:

101 Candlelight Ln.
Morris, IL 60450
Hours are Wednesdays Noon-7:00 pm 
 The program runs the duration of Lent beginning March 13 and ending April 10. Three stations will be available for viewing each week. 

We would like to thank; Lynne Kiefer Kobylecky for permission to use her artwork and Plaid Crafts for providing paint, brushes, and mediums to use with this project. 


Check out the photos below for a sneak peek on the behind the scenes of this project: 

Supplies used: Photos, Canvases 8"x 10" and 2"x 2", Plaid Folk Art Paint, Plaid Folk Art Crackle Medium, Brushes, Sponge, Mod Podge Ultra, Hazel and Ruby Number Masks, 


Friday, February 15, 2019

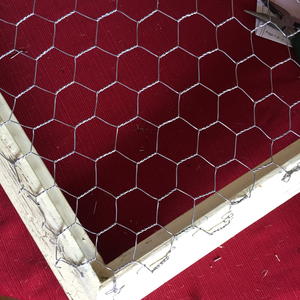
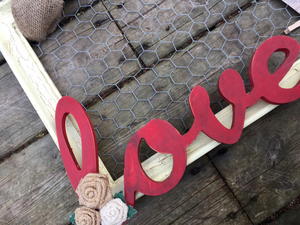
"Love" chicken wire photo display

I loved this project I created for my son and daughter-in-law and it's always fun when others agree with you.  I just found out that this pattern is featured in "8 Old Picture Frame Crafts" by Fave Crafts. Be sure to stop by there and check out my project and all the others in the collection.  

Looking for a fun way to display photos with a vintage feel. Creating this rustic, chicken wire photo frame is a cinch with Plaid Craft paint and finishes. 


Materials List:

Wood Frame (purchased from thrift) 
Plaid Crafts Folk Art Metallic Acrylic Pure Gold 
Plaid Crafts Folk Art Chalk Paint-Bavarian and Tuscan Red 
Plaid Crafts Folk Art Crackle Medium 
Plaid Crafts Folk Art Antiquing Wax 
Plaid Folk Art Paint Brushes 
Chicken Wire 
Protective Gloves 
Wire Cutters 
Needle-Nosed Pliers 
"Love" wood cutout 
2 yards of 3" Burlap Ribbon 
Burlap Flowers 
Wood Clothespins 
Soft Cloth 
Scissors 
Hot Glue Gun/Glue Sticks 

Instructions

  1. Remove picture and glass from frame if necessary, Clean frame well. Paint Frame with Plaid Crafts Folk Art Metallic Gold Paint and allow to dry. When dry, using paint brush, cover frame with Folk Art Crackle Medium using even brush strokes, be careful not to overdo it. The thicker the coat the thicker the crackle. Allow to dry. Apply a top coat of Home Decor Chalk in Bavarian. As the paint dries the cracks will appear.
  2. While frame is drying paint the word Love with a coat of Plaid Crafts Home Decor Chalk Paint in Tuscan Red allow to dry. When frame and "Love" are dry, apply a coat of antiquing wax over the surface of both using a brush. Use a soft cloth to buff away the excess and bring to a sheen.
  3. Turn frame over and measure the chicken wire to cover the back opening. Trim as necessary using wire cutters. Be sure to wear protective gloves. Secure chicken wire in place on back of frame covering the opening. Secure chicken wire in place with staple gun. Turn sharp edges of wire under using the needle-nose pliers.
  4. Face the frame front again, Glue the word love in place. Embellish as desired with burlap flowers. Run a loop of Burlap Ribbon through the top of the frame and chicken wire on both sides and tie in a bow. Trim ends if desired with scissors.

  5. Use clothespins to secure photo (s) hang frame by bow.


There you have it, a cute way to display some favorite photos! I especially like the photo I have selected as this is my son and new daughter-in-law! 

A special thanks to Plaid Crafts for providing the paint and finishes for this project!

Monday, February 4, 2019

That image in your head

I've never been a painter...mom was. She could see something and copy it.  It was an amazing skill I was always desiring. I am trying to learn that skill. This image has been in my head for quite sometime. I drew it out and then it sat and sat and sat... I really haven't been able to move on from it or away from it. So it has sat

 So today I decided it was the day to finish. 

It's based on Acts 17:27 "God intended that they would seek Him and perhaps reach out for Him and find Him, though He is not far from each one of us."


It's far from perfect, but I'm pleased with the effort and maybe someday I'll repaint it when I have acquired more skill. Until then...I can move on :)  Until the next image gets stuck in my head! 


Need to add a quick thank-you to Plaid Crafts As an ambassador they help provide me with paints and brushes to get those images out of my head and into reality!

Wednesday, January 16, 2019

Sharing the Creative Heart-Creativation (Before the show)

Every January, members of the Association for Creative Industries (AFCI) (formerly CHA) get together at "Creativation"  the annual trade show and convention. This is a time of connecting, equipping and learning about new products and opportunities within the creative industry. I have a member of the association (and attending the shows since 2003.)

These last couple of years I have been a part of the designer section of the association. The last couple of years the designer section has held a event called "Sharing the Creative Heart". Designer members are encourage to create an original piece of art to leave someone on the show floor for some random person to find and take home. The only guideline, have a heart someone on the piece.

I participated last year and received such a sweet and encouraging email from the gal that found the canvas I made. She shared how it inspired her to create and share with others.

Since I had such a sweet response last year, naturally I had to participate again! My inspiration came from one of my favorite bible stories found in 1 Samuel 16:1-13, the calling of David. In this story the prophet Samuel is told by the Lord to go anoint the new king of Israel. He is told to go to the house of Jesse to anoint one of his sons. When he gets there and asks to see his sons, Jesse brings out his oldest son, Samuel first thought was "yes this is surly the one to be king." The Lord "NO" for "Man looks at the outward appearance, but I look to the heart." I wanted what I created to be a reminder to "look to the heart" in all that you do and with all those you meet.

This year since I had some down time, I decided I just needed to play, so I pulled out my Gel Press Mono-printing plate and made some prints on mini canvases. I love mixing the paints, and adding texture with plates, bubble wrap and more, it's so fun (and very relaxing) and each print is unique!


I had so much fun I ended up with 12 mini (3"x3") canvases.  


Then I got to have fun embellishing. I found a whole bunch of brass charms and findings at the thrift store (a major score for $1.99) the brass color was too dull for what I wanted to use them for so I used Krylon's 18k gold leafing pen. I then added hearts. To create the darker hearts I used cardstock and "leatherized it" (spritz it with water, and crumple it up several different times and ways, smooth out and blast with a heat gun.) The "leathered paper", really does give the paper the look of leather, and adds a fun texture to enhance with ink vs. smooth cardstock. To finish off I added touches of flowers, gemstones, even some random stamping and washi tape.


I then wrote the phrase "look to the heart"  on strips of vellum and added those to the canvas as well. To finish things off I added a flat piece of magnet to the backs of the canvas, since they are small enough, I figured people could use them as a fridge magnet.


If you are at the 

be sure to look for:


To be able to take home your very own piece of art from a creative heart!

Products used: 3"x 3" mini canvases, Gel Press Monoprinting Gel Plates, Plaid Crafts Folk Arts Acrylic Paints, Krylon 18k Gold Leaving Pen, assorted brass charms, vellum, flowers, glass dots, felt trim, Little B Washi Tape-Gold Collection, assorted gemstones, hot glue, ranger archival ink in black, and strip magnet.