Showing posts with label wedding gifts. Show all posts

Friday, February 15, 2019

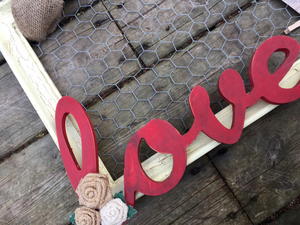
"Love" chicken wire photo display

I loved this project I created for my son and daughter-in-law and it's always fun when others agree with you.  I just found out that this pattern is featured in "8 Old Picture Frame Crafts" by Fave Crafts. Be sure to stop by there and check out my project and all the others in the collection.  

Looking for a fun way to display photos with a vintage feel. Creating this rustic, chicken wire photo frame is a cinch with Plaid Craft paint and finishes. 


Materials List:

Wood Frame (purchased from thrift) 
Plaid Crafts Folk Art Metallic Acrylic Pure Gold 
Plaid Crafts Folk Art Chalk Paint-Bavarian and Tuscan Red 
Plaid Crafts Folk Art Crackle Medium 
Plaid Crafts Folk Art Antiquing Wax 
Plaid Folk Art Paint Brushes 
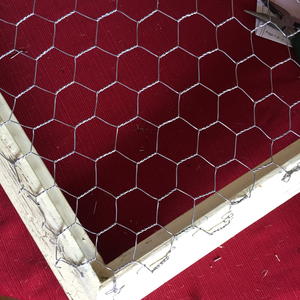
Chicken Wire 
Protective Gloves 
Wire Cutters 
Needle-Nosed Pliers 
"Love" wood cutout 
2 yards of 3" Burlap Ribbon 
Burlap Flowers 
Wood Clothespins 
Soft Cloth 
Scissors 
Hot Glue Gun/Glue Sticks 

Instructions

  1. Remove picture and glass from frame if necessary, Clean frame well. Paint Frame with Plaid Crafts Folk Art Metallic Gold Paint and allow to dry. When dry, using paint brush, cover frame with Folk Art Crackle Medium using even brush strokes, be careful not to overdo it. The thicker the coat the thicker the crackle. Allow to dry. Apply a top coat of Home Decor Chalk in Bavarian. As the paint dries the cracks will appear.
  2. While frame is drying paint the word Love with a coat of Plaid Crafts Home Decor Chalk Paint in Tuscan Red allow to dry. When frame and "Love" are dry, apply a coat of antiquing wax over the surface of both using a brush. Use a soft cloth to buff away the excess and bring to a sheen.
  3. Turn frame over and measure the chicken wire to cover the back opening. Trim as necessary using wire cutters. Be sure to wear protective gloves. Secure chicken wire in place on back of frame covering the opening. Secure chicken wire in place with staple gun. Turn sharp edges of wire under using the needle-nose pliers.
  4. Face the frame front again, Glue the word love in place. Embellish as desired with burlap flowers. Run a loop of Burlap Ribbon through the top of the frame and chicken wire on both sides and tie in a bow. Trim ends if desired with scissors.

  5. Use clothespins to secure photo (s) hang frame by bow.

There you have it, a cute way to display some favorite photos! I especially like the photo I have selected as this is my son and new daughter-in-law! 

A special thanks to Plaid Crafts for providing the paint and finishes for this project!

Sunday, April 8, 2018

Modern End Table from Wedding Treasures putting it all together (part 3 of 3)

*This is part 3 of 3 be sure to visit part 1 and part 2

My friend Amy came to me asking for help with her wedding because I am the "creative one." Wanting something different for a guest book and needing something to use as a cake platter. I devised a 3 in 1 project to fit the bill. The first part, a wood round, with their initial burned into it became the guest book. Then I etched a piece of custom cut glass to become a personalized cake platter for their big day.  Today we are going to put it all together to create a modern end table from their wedding keepsakes.


To start I wanted to preserve the signatures on the wood disk. Because they are only on with sharpie and no matter how "permanent" the marker says it is, if exposed to certain chemicals or even harsh sunlight the color can smear or fade. To seal I  first did a light coat of Crystal Clear Enamel Spray from Rust-Oleum and allowed to dry. I used a spray sealer because any amount of rubbing on the marker with a sealer will cause it to smear. This being said, be VERY careful during this step not to touch the area where the marker is. Once the light coat is dry, spray with a 2nd coat and allow to dry as well.

Now it was time to attach the wood to the table base. For the base Amy and Otto wanted something similar to the style of the wedding venue, kind of industrial and a bit rustic. I found this wonderful "counter height" bench on Amazon. It had good reviews, and best yet the seat on the bench was round, so with a bit of luck it should be easy to swap out the seat for the table top.


I removed the hardware from the bench seat and centered it on the back of the wood disk. Then using a drill, screwed the hardware to the wood. From there I simply followed the directions to assemble the bench.


I then placed the glass onto the table top. Remember the "clear bumpers" applied to the back of the glass. I found that by using the raised ones, you could see the etching better. 

From cake platter and guest book to end table!

Congrats Amy and Otto!
May the two of you be blessed on your journey together! 

Supplies used: industrial counter height bench, drill/drill bits.  

Be sure to check out Part 1 and Part 2 to see how the guest book and cake platter were made

Special thanks to the following companies: Plaid Crafts and etchall® 


Friday, April 6, 2018

Modern End Table from Wedding Keepsakes-the wood guest book (Part 1 of 3)


* This is part 1 of a 3 part series, be sure to visit Part 2 and Part 3
When my a dear friend from high school comes to you for help with her wedding because you are the “creative type” you naturally offer to help anyway you can. 

Amy’s dilemma, a “creative” guest book. The problem with traditional guest books you stick them in a drawer or box after the wedding soon to be forgotten about. Amy wanted a keepsake that would remind her of the family and friends that celebrated her special day.

As I talked to Amy more about what they were looking for with not just wedding decor but  home decor as well.  I found that her and Otto liked simple… rustic..industrial…with a touch of elegance. She also mentioned in passing that they were looking for something to use as a cake platter as well.

This got me to thinking “what if we could make separate pieces, that somehow fit together to become a keepsake when the wedding was over?” 

The idea for a "guest book end table" came into being.


I started with a wood round found at the hardware store. 


Almost 18” in diameter it would allow plenty of space for guests to sign their names. I brought this wood round to our local lock and glass store. (Thanks Jerry's Glass and Lock for the fast service) I told them I needed the glass to be for a table topper and cake platter and they suggested the thickness and then had a piece cut to match ready for me the next day! Setting aside the glass to etch later I began work on the wood. 


After a light sanding, I stained the wood a lovely "Summer Oak" color by Rust-Oleum.


I wanted to add their initial to the round, tracing a large letter “S” lightly with pencil. 


 I then followed my lines and filled them in with the Folk Art Wood Burner. I used the round tip and a "medium-medium high" setting for heat. 


This piece will then become the "guest book" for family and friends to sign at the wedding. 


To see "what comes next" be sure to visit, part 2 and part 3. There I will show you how I created the etched cake platter, and then put everything together. 

Supplies used: Wood Round, Rust-Oleum Wood Stain in "Summer Oak",  Folk Art Wood Burning Set-Plaid Crafts, Wood letter to trace. 

Thank you to Plaid Crafts for providing the wood burning set. 


SaveSave