Showing posts with label gift. Show all posts

Monday, January 5, 2015

Quick Gift Set!

"Mom I need a birthday gift would you make a scarf and maybe a headband?..."

This question was posed to me in the middle of the store. So off we ran to the yarn aisle hoping to find colors suitable for her friend. Thankfully we found a lovely assortment of Lion Brand Yarns in yummy colors such as Oatmeal, and Little Rock Granite. Grabbing a skein of each we set off for home.

At home,  I was told her friend loved a bit of sparkle, thankfully I had some fun "Lion Brand Bonbons" the "party" collection, I had offered a whole rainbow of yummy sparkly colors including a gold that added the perfect touch of sparkle my daughter was looking for. After deciding she wanted a chunky infinity scarf, I went to work arm knitting a scarf, thankfully because of the size of the stitches, the scarfs are pretty quick to knit. I was able to finish it in about 1/2 an hour.

For the headband, I chose two of the three colors used in the scarf, I followed my "fast finger knit headband" pattern altering the ending a bit to keep it three rows throughout the entire headband. The finishing touch was a flower created using the flower loom by the Crochet Dude. We choose the Little Rock Granite and the Gold Bonbons to create the flower.


Naturally my daughter needed to model the finished product. I think the set turned out quite cute!


It's now safely wrapped up ready for her to take back to school and gift to her friend. 

*edited to add, her friend Rosalle loved it! She even sent me a photo of her wearing it as a thank you!

HAPPY BIRTHDAY ROSALLE!!


Saturday, October 4, 2014

The Gift of Art!

As I was growing up mom was always drawing, always creating. This bode well for my sister and I who followed in her footsteps, and loved to get messy with a craft project or two, not to mention her students at school that benefitted from awesome bulletin boards in their classroom, and fabulous art projects during class!

When Mom retired she took up painting again, she had learned to paint with her grandmother whom everyone called "Nana." She told us how Nana would have her paint and repaint pictures over and over practicing brush strokes and techniques. She mostly worked in acrylics but dabbled some in oils. 

Cleaning out mom's easel and paints was the one of the most difficult parts about closing up mom's estate.  (Second only to her music collection.) Mom loved creating, painting, that form of creative expression of taking an idea in your mind's eye and transferring it to a visible media. How do you just put them away to be silenced forever? 

Her easel sat for quite some time, I had a difficult time touching it. Mom never expected to be in the hospital more than a few days, her painting was there waiting for her to finish. Just like my sister and I kept feeling like we were waiting for her to come home. But she never came home, and so there her easel sat on the sun porch. Patiently waiting for someone to come use it. There her painting sat waiting for mom to finish it...but she never will. 


I saved some of her paints and brushes for my personal use, but I never mastered painting let alone drawing with any major skill.  I  didn't have the space for the easel and knew mom would want them to be used. So with my sisters blessing, I was able to share mom's easel and some supplies with my BFF's husband. Sherri and I have known each other since birth and she is part of the family, her husband Jason, fit right in with the rest of us and connected with mom because of his love of art and ability to paint. Use them well Jason! 


Friday, September 26, 2014

Just playing around

What do you do when you find a paper mache' mask at the thrift store and have peacock feathers, music and a pin of your moms? Naturally you play around and get creative.

I started off painting the mask a iridescent blue, (blue was mom's favorite color)  then layered on the music paper and gemstones. Finishing off with an eyepatch also shaped like a music note and hot glued the music pin, to finish off I tucked the peacock feathers under the pin.


Not quite pleased with how it turned out, I think I would have sharpened the black patch over the eye more of a triangular shaped note. I ended up blessing a friend of my mom's with the mask, and she didn't seem to mind either way. It was a fun reminder of a very special lady. 

Monday, January 9, 2012

Altered Tile

My mom always tells me her music is her prayer. So I knew I had to create something for her that said as much. This is a plain 12 x 12 tile. After trimming the paper slightly (I wanted to actually show the tile vs. just having paper shown.) I inked the edges first with gold then with "vintage photo". Then I grabbed my mod podge a sponge brush and went to town. I Mod Podged paper and the quote onto the tile and then added a couple of extra coats of Mod Podge for good measure to seal everything. To finish everything off I found this wonderful gold book stand that really accented the gold from the paper.

Supplies used: 12 x 12 tile, Patterned paper Autumn leaves (from 2000 yes 2000 is that considered vintage in the paper crafting world?), Ink, Ranger-Vintage Photo, Stampabilities-Gold, Cricut Cartridges- Jubilee, Plantain Schoolbook, Lyrical Letters, Base Camp, and Alphalicious. Mod Podge.

Saturday, December 10, 2011

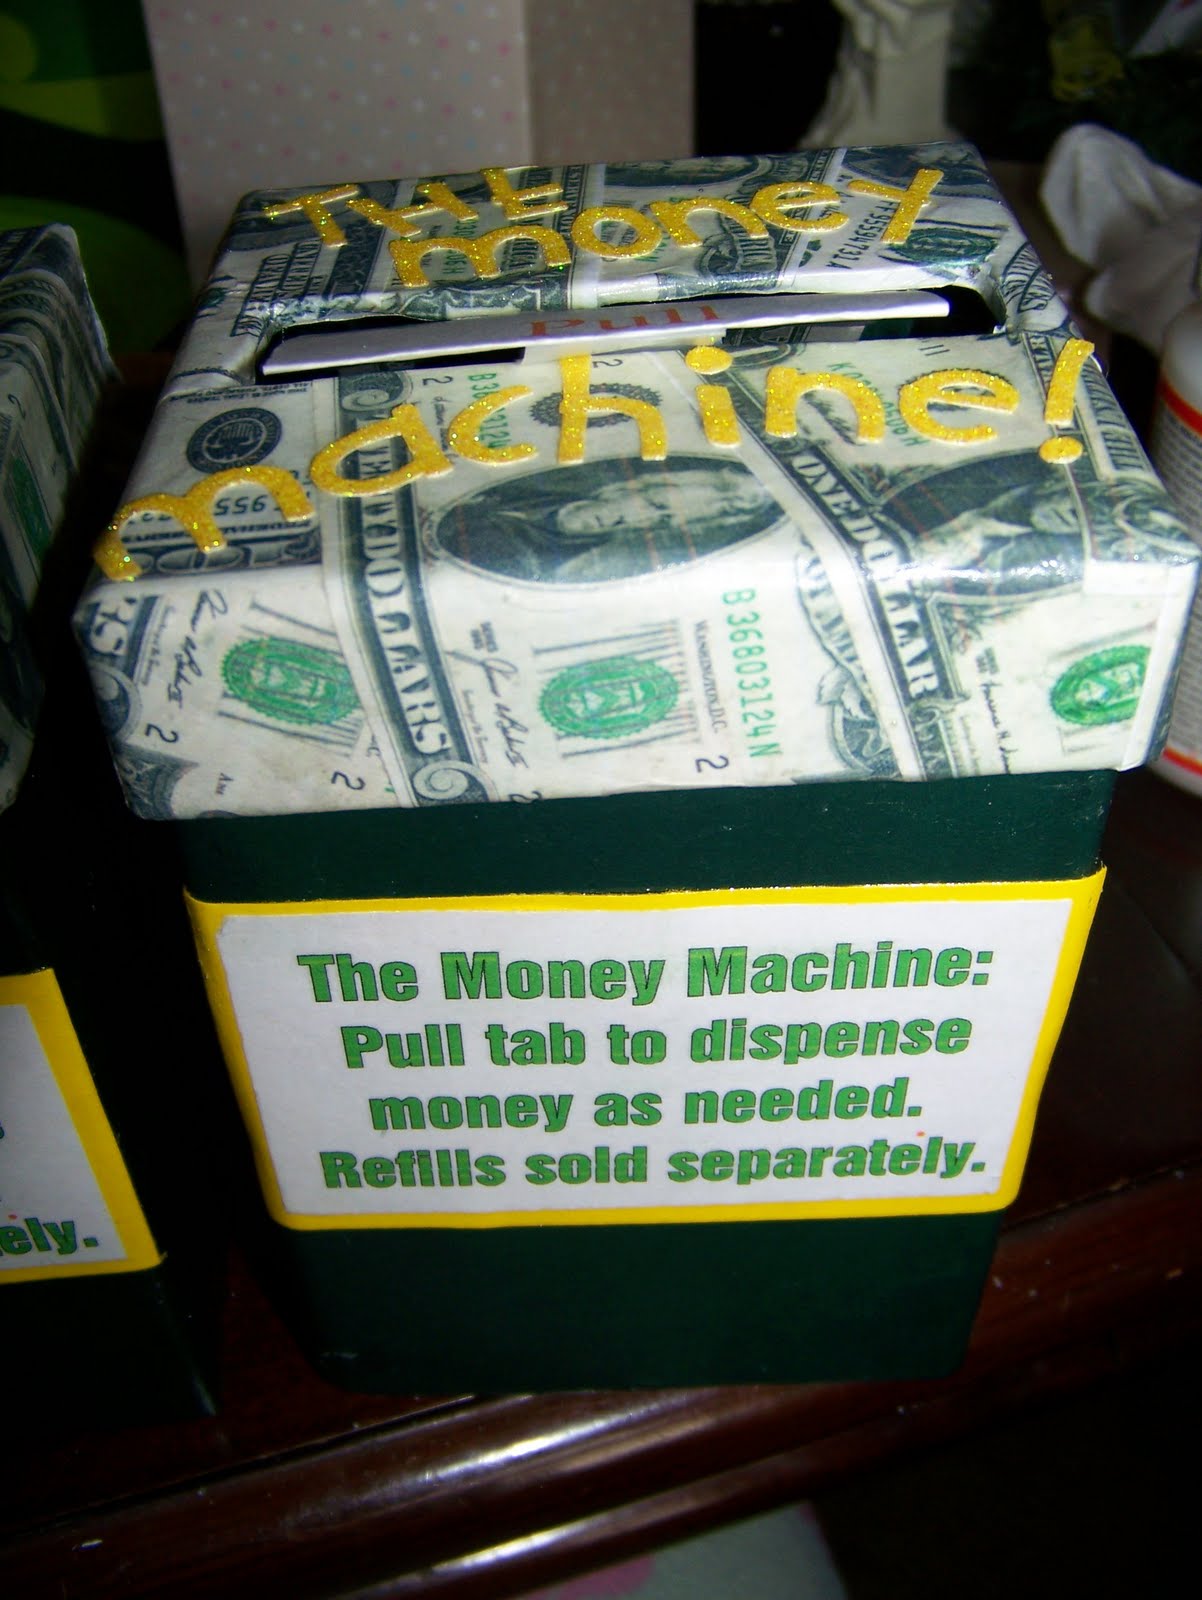
The Money Machine!

It's the season of giving!! I love finding the perfect gift for all the people on my list, but some people are just difficult to shop for or you just know a gift of cold hard cash could be most appreciated this time of year.

So enter in the need to find gifts for two very special ladies. One of them put together an entire government/constitution class for two of my kids (and 15 others) and the other opened her home to us to have that class for 12 weeks! The families of the students wanted to get together and bless these ladies in some way. After tossing around several places to give gift certificates to, it was decided cash would be the best gift and since I never want to just "give cash" I had to find a creative way to present it. So enter in

"The money machine"

I saw several of these "premade" boxes online ranging from $5 to $17 dollars (plus shipping) Thinking I could make something that would be much cuter I decided to try making my own.


Start by taping your bills together end to end (I used a small piece of tape on both sides for extra strength.) The "store bought" ones came with a roll of repositionable tape. I experimented and found the scotch "matte finish" came off the bills nicely (as long as the tape didn't over lap the entire edge of the bill.)

When your money chain is finished rolled up the bills and place in a box that will fit not only the roll but big enough you can cut a slit in the top to feed your chain through.

Never being one to want a "plain" box I decided to decorate mine some. I got out the Mod Podge, printed off some "play money" and went to town "Podging" the money onto the top of the box and adding the letter stickers when done. I gave it a final coat of Mod Podge to act as a sealer to make sure the stickers stayed in place.


I added some directions I created and printed off and then also realized I wanted some type of "pull tab" to thread through the top of the box so this I also printed off and then taped to the end of the dollar bill roll.

Then it was just wrapping them and waiting the agonizing couple of days till we could give them away!

Supplies used: Mod Podge, play money (images printed from online), letter stickers (stickabilities), Fiskars fingertip craft knife.


Monday, October 18, 2010

Christmas gifts--candied popcorn trial run


So I love candied popcorn and it's one of the easiest gifts to make for the holidays BUT we always have to have a trial run so I remember the recipe. Tonight was the night, we are having a movie night and one of the kids had a hankering for it (and I only make it around the holidays.)

Ingredients are simple

4 quarts (16 cups) popped pop corn
3 T. butter melted
a couple of shakes of salt
1/2 bag of Wilton candy melts

Pop corn, add melted butter and salt (you want a 'hint' of salt not need to get a gallon of water to finish your popcorn salt) toss until mixed, melt candy melts according to directions and then pour over popcorn, toss until coated and then I throw the bowl in the freezer for 10ish minutes to harden it faster be careful though when it's frozen it can "break" when you are removing it from the bowl )

Break apart and store in an air tight container. (or eat like a pig it's YUMMY)

You can also color the candy melts (Wilton makes special coloring for it) to match the holiday, (think red and green for Christmas, red, white and blue for the 4th, orange and green for fiskateer events ;)

I'll package this up in clear gift bags and then top with cute ribbons with tags...it's always a hit!

Friday, September 17, 2010

The cat and the Hat


I cut up a book (I really did)
All because my friend is having a kid.

The nursery is adorned with Dr. Suess of all things
So naturally I had something crafty to bring!

I found this here "mobile" from a store called Ikea
and Shanon's banner inspiration gave me an idea.

I cropped and I cut favorite pictures from a book,
And layered with cardstock to give it the right look!

The shower's tomorrow I can't wait till she sees.
The gift that I brought her handmade by ME!


You can't tell from the photo because I had to stick it against the wall to get a better shot, but it spins and things are two sided. The turquoise ribbon looks 3-d swirly cause of how I wrapped it around the clear wire hangers.

Supplies used: hanging mobile photo frame from I
KEA (got at a garage sale for FREE. )Various Dr. Suess books (bought at the thrift) , Assorted cardstock, Fiskars trimmer and finger tip craft knife. Ribbon.

Total cost for project..$2 (Oh and see the other photo for how it's being presented....also got for FREE (same sale...SWEET)

Thursday, July 8, 2010

Crafty Gifts


Time for something crafty! I love making these. It is a calendar memo board I made as a gift for a friend. Any glass surface will act like a dry erase board! There's room for a calendar and space on the side and top for notes. The frame is just a 12 x 12 frame make sure it has glass in it vs. plastic (the plastic doesn't hold up as well to prolonged dry erase marker usage)


I've been trying to use up my stash so I only know the card stock is Prisim, (oh I'll really miss them) flowers Prima, gems (craft gems) the rest is from a MemoryWorks Express Kit from like 2 years ago. Ranger Ink (Vintage Photo) adhesive Glue Dots, Scrapbook Adhesive by 3L tape runner.

Tuesday, June 8, 2010

Teacher Gift


David loves his speech therapist and at the end of the school year wanted to give her a gift! We decided to make her a dry erase calendar. These are super easy and people LOVE them.

take a 12 x 12 frame (or LP frame same sized) you need glass in the frame, plastic works but it's harder to clean at the end of the month. Create your calendar page put it into the frame and VOILA' fabulous handmade gift. David was so excited to have made it himself, he picked out the paper, punched the shapes, inked the edges, and helped put the whole thing together!


Supplies used: Patterned paper-Fancy Pants, white cardstock-prism, Ink-Quick Quotes, Prima Flowers, Doodle Bug buttons, embroidery floss, Fiskars -apron lace border punch and Flower Power squeeze punch, tape runner and Glue Dots!

His therapist LOVED it!!!

Wednesday, April 14, 2010

Van Gogh with a needle!--another gift from the heart!

I work part-time at the YMCA. Since I work in the membership department I get the privilege of meeting all sorts of amazing people. One of those people is Jesse. Jesse and his wife come in to swim and while she is making herself beautiful, Jesse and I talk crafting. He is amazing. Woodworking, gardening, and more...you name it he has probably done it! One of the things he is most known for is his needle work. (Because of this I got him a pair of Gingher embroidery scissors last time I was at the Fiskars warehouse.) Jesse jokingly refers to himself as "VanGogh with a needle." His paints are the thread, his brush is a needle, his canvas is the fabric.
Jesse follows patterns and also creates his own designs. Like this

Jesse surprised me one day at work with this. He found out my initials and my husbands then created these hand embroidered pillow cases for our bed. (Apparently at his church they are the #1 requested wedding gift!) His gift overwhelmed me, I was speechless, they are so beautiful! Thanks Jesse for sharing your talent with us! We love them, they are almost too pretty to sleep on!


Tuesday, January 5, 2010

A "new" gift from the past

I love handmade gifts, I love vintage-y things and love gifts with meaning so this gift my mom got from her sister really impressed me. The gift was a quilt. Not just your standard quilt (which would have been cool) but a quilt representing 3 generations of women from my mom's side of the family. (Four if you count my contribution of tools.) As if that didn't impress me enough my aunt even pulled out some favorite Fiskars tools to help create this heirloom quilt.

Using fusible web, scissors, and the Fiskars ultra shape express she turned old handkerchiefs (from my grandma and great grandma) into lovely appliques, the lace accent pieces are handmade lace from my great aunt and great grandma. It truly beautiful and means so much more because of what it was made of!

(Can you find what she used the USX on??)


Thursday, September 25, 2008

Simple Gifts

I love making gifts for family and friends but don't always have a ton of time. Therefore I have to look for something that is cute but fast. These binder clip photo/card holders fit that description to a "T".

I found this idea right before the MemoryWorks retreat and so I just had to make up a bunch for the Home Office Staff and the Creative Team. (From the smiles on their faces I think they liked them *grin*)

To make you simply take a Jumbo binder clip and cover the clip part with modge podge, and cover with patterned paper or card stock. Tuck your edges in and cover with a few coats of modge podge. When dry, use glue dots to add embellishments and then tuck in a photo or card in the silver "handle" part and voila' fast and fabulous gift. They make a cute arrangement when you use photos of different heights too.

For more detailed instructions and another idea on how to use them check out Faithfully Yours . This project is part of their Friday ezine and in the September Ministry Guide.